
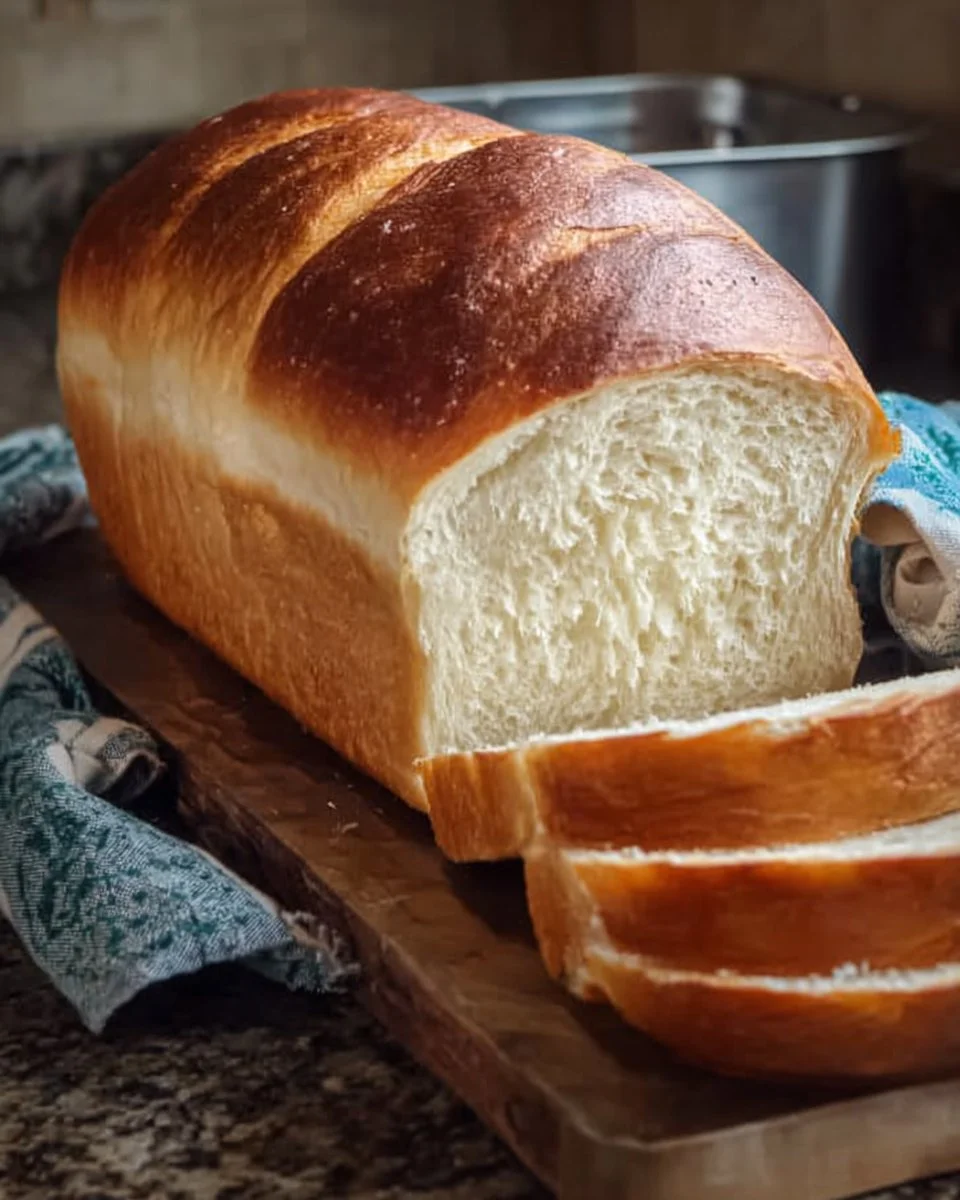
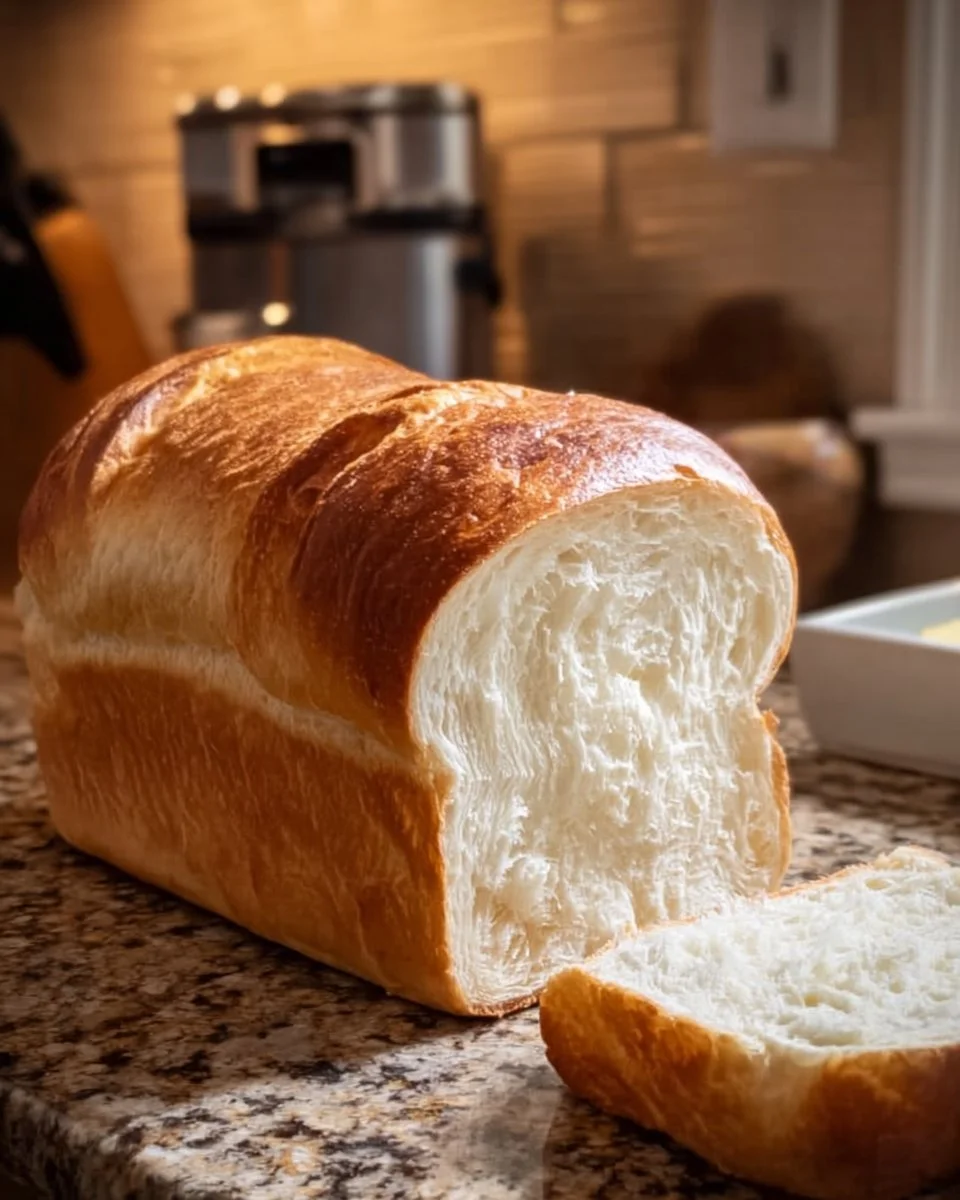
Easy Softest Homemade Sourdough Sandwich Bread
Introduction
I still remember the first time I tried to make sourdough sandwich bread. It was a rainy Saturday, the kind that smells like toasted garlic and laundry detergent, and I had my starter in a mason jar that looked like it could double as a science experiment. I read one too many articles promising “no-fail” results and thought, huh — how hard can bread be? Famous last words. My loaf came out lopsided, with one mysterious crater and a crust that sounded like it was auditioning for a maraca band. Oops.
But then I learned the gentle, comforting magic of a simple formula: 3 cups all-purpose flour, 1 cup water, 1/2 cup active sourdough starter, 1 teaspoon salt, 1 tablespoon sugar, and 2 tablespoons olive oil. It sounds humble, right? That first ugly-but-delicious slice, warm and steaming, hugged my tongue in a way that store bread never could. Since then, I’ve tweaked, failed, improvised, and at times panicked (to be real, I once forgot a loaf in the oven and had to improvise a rescue mission with a damp towel — don’t ask), but I always come back to this recipe because it’s forgiving, cozy, and perfect for easy weeknight dinners or healthy comfort food lunches.
This loaf smells like nostalgia — yeast, a whisper of tang, toasted flour — and it makes sandwiches sing. It’s not fussy, and it doesn’t require perfect timing or a temperature-controlled kitchen. If you’ve ever wanted to make something that feels artisanal but functions as a daily workhorse (think packed lunches, late-night grilled cheese, or thick slices for peanut butter mornings), this is your recipe. Whether you’re feeding two or feeding a hungry crowd, whether you’re into budget-friendly recipes or want something that plays nicely with meal prep, this bread fits.
Why You’ll Love This Recipe
- It’s ridiculously forgiving — perfect for those of us who are learning, juggling kids, remote work, and the occasional kitchen disaster.
- Soft crumb that’s ideal for sandwiches, toast, and dipping, so it’s great for quick family meals and ready meals for 2.
- Uses simple pantry staples; excellent for cheap meal plans for 2 and best meals to prep for the week.
- Keeps well and freezes beautifully, which means you can prep ahead for healthy eating for two or busy weekdays.
- A mild sourdough tang that pleases picky eaters — it’s basically comfort food that behaves.
- Feels like a hug from the inside out — truly healthy comfort food that doubles as therapy.
What Makes This Recipe Special?
I think the secret is its balance. There’s enough tang from the starter to make it interesting, but not so much that it screams “I bake sourdough on weekends only.” The sugar and olive oil do the surprisingly important job of tenderizing the crumb, giving it that pillowy softness that makes sandwiches — turkey, avocado, tomato and a smear of mayo — feel like actual joy.
My favorite memory: bringing a warm loaf to a friend whose partner had just had surgery. They said it made their tiny hospital kitchen feel like home. Food does that sometimes — it becomes a practical kindness. Also, learning small tricks along the way (like the “gentle poke” test and trusting your nose) has turned this from a recipe into a ritual.
Ingredients
This recipe is gloriously simple, and each ingredient earns its keep. Let me walk you through why I use what I use, and the little brand quirks or substitutions that have saved me more than once.
- 3 cups all-purpose flour — The backbone. I usually use a reliable, mid-range brand (King Arthur or a good store brand) because it has just enough protein to give structure without getting chewy. Want an even softer crumb? Substitute up to half with bread flour; the texture changes a bit but still lovely.
- 1 cup water — Room temperature is fine. If your starter lives in the fridge, use slightly warmer water (not hot) to coax it awake. The water hydrates the flour and activates gluten. Don’t skimp here.
- 1/2 cup active sourdough starter — Feed it a few hours before you plan to bake so it’s bubbly and lively. If it’s sluggish, it will make your rise take forever, and who needs that drama?
- 1 teaspoon salt — Salt isn’t optional. It controls fermentation and flavors the loaf. I use fine sea salt most days.
- 1 tablespoon sugar — This tenderizes and offers the yeast a little snack. You can swap for honey if you want a slightly deeper color and flavor.
- 2 tablespoons olive oil — This gives softness and sheen to the crumb. I keep a mild extra virgin on hand; a neutral oil works if you’re out.
Personal tips: measure flour by weight if you can — baking scales are tiny miracles that prevent flop dough. If you measure by cups, spoon the flour into the cup and level it off rather than scooping — otherwise you’ll be in dense-bread territory. Don’t over-knead with machines if your stand mixer is on the fritz; my arm learned that lesson after a 25-minute session. Also, avoid adding too much flour during kneading — a slightly tacky dough is better than sandpaper.
Don’t do this: add too much flour thinking you’re helping. It’s the most common mistake. Your dough should be smooth and elastic, not a biscuit dough. If it’s sticky, embrace the stickiness for a bit — oil your hands, use a bench scraper, and resist the urge to bury it in flour.
How to Make It Step-by-Step
This is where the kitchen gets real. I’ll walk you through the dough’s personality shifts — from shaggy lump to proud loaf — and share the times I panicked and what I learned.
Step 1: Mix it up
In a large bowl, toss the flour, water, sourdough starter, salt, sugar, and olive oil together until everything starts to come away from the sides. The first time you do this, the dough will feel like a clingy friend. It’s okay. Let it sit for 10–15 minutes for autolyse — this quiet rest hydrates the flour and makes kneading softer work. You’ll notice the surface smoothing out a bit, like it’s settling down to gossip.
Step 2: Knead (the long, dramatic montage)
Knead for about 10 minutes until the dough is smooth and elastic. I used to knead like I was trying to win a prize: elbow high, face serious. Then I learned the “fold and quarter” method — push with the heel of your hand, fold, turn, repeat. Your dough should pass the windowpane test (gently stretch a small piece — it should thin to a translucent sheet without tearing). If you tear it, don’t sob; just knead a minute more. My husband once set a timer for 20 minutes because he thought more was better. We ended up with a denser crumb — a helpful reminder that patience and timing matter.
Step 3: Bulk rise — the waiting game
Place the dough in a lightly oiled bowl, cover with a towel or plastic wrap, and let it rise in a warm place for 4–6 hours or until doubled. “Warm place” is whatever warm nook you have — I use the oven with the light on or a sunny windowsill (but not too sunny; you aren’t baking yet). The first time I did a long rise, I forgot it for 10 hours. The loaf was a bit over-fermented and flattened during shaping. We learned to set a reminder. The dough should look puffy, with bubbles on the surface and a slightly domed top. Trust your eyes — not the clock.
Step 4: Punch down and shape
Punch down the dough (gently — pretend it’s a sleeping baby). Turn it out onto a lightly floured surface, shape into a loaf by folding the edges under and rolling to build tension. I like to let it bench rest for 10 minutes if it resists shaping; it calms down and becomes more cooperative. If you want a taller loaf, shape tighter.
Step 5: Final rise in the pan
Grease a loaf pan and place your shaped dough inside. Cover and let it rise again for 1–2 hours, until it’s puffed and almost reaching the top of the pan. This second rise is when your patience pays off. I once rushed this step and baked an under-risen loaf that resembled a wrestler’s pancake. Don’t be me.
Step 6: Bake
Preheat oven to 375°F (190°C). Bake the loaf for 30–35 minutes, until golden brown and the center reads about 200°F if you have a thermometer. If you don’t, tap the bottom of the loaf — a hollow sound means baked through. The crust will be beautifully golden and slightly crisp. I love the oven smell here: toasty, warm, and faintly tangy.
Step 7: Cool before slicing
Let the loaf cool completely before slicing. I know — the warm slice temptation is real. But cutting too soon makes the crumb gummy. Wait at least an hour. My record is failing at this restraint and serving a loaf that was delicious but a little gummy. Lesson learned.
Throughout, smell, touch, and sight will be your best friends. When the dough smells fresh and slightly tangy, you’re on track. If it smells sharp and alcoholic, it’s probably over-fermented. If the dough resists stretching, give it a rest. Baking bread is part science, part babysitting, part meditation.
Tips for Best Results
- Measure flour by weight when possible — 3 cups of all-purpose is approximately 360 grams (but scales make life easier).
- Keep your starter active: feed it regularly and use when bubbly.
- Use a warm, but not hot, ambient temperature for rising — aim for roughly 75–82°F.
- Don’t rush the final cool-down. The crumb sets as it cools.
- Lightly oil your hands instead of flouring them when shaping to avoid adding too much flour.
- For a shinier top, brush with olive oil right out of the oven.
- If your loaf browns too quickly, tent with foil for the last 10 minutes.
Ingredient Substitutions & Variations
- Whole wheat swap: Replace up to 1 cup of all-purpose with whole wheat flour for a nuttier flavor. Expect a denser loaf.
- Dairy-free: This recipe already is dairy-free — hooray for simple swaps!
- Sugar alternatives: Honey or maple syrup can replace sugar for a deeper taste.
- Olive oil alternates: Use avocado oil or a mild vegetable oil if your pantry is out of EVOO.
- Enriched loaf: For a richer bread, fold in 1/4 cup milk or 1 egg during mixing (if you’re not avoiding animal products).
- Add-ins: Seeds (sunflower, sesame), herbs (rosemary), or grated cheese (substituted with a plant-based option if you avoid dairy) make delightful variations.
- Gluten-free? This recipe isn’t built for a straight swap. For no prep healthy lunches with gluten-free needs, consider a specifically formulated gluten-free bread recipe.
Directions
Mix the 3 cups all-purpose flour, 1 cup water, 1/2 cup active sourdough starter, 1 teaspoon salt, 1 tablespoon sugar, and 2 tablespoons olive oil in a large bowl until a dough forms. Knead for about 10 minutes until smooth and elastic. Let rise in a warm place 4–6 hours until doubled. Punch down, shape into a loaf, and place into a greased loaf pan. Let rise again 1–2 hours. Preheat oven to 375°F (190°C) and bake 30–35 minutes until golden brown. Cool before slicing.
Pairing Ideas (Drinks, Sides, etc.)
This bread pairs with almost everything. For breakfast, smear with butter and honey, or make a classic avocado toast. For lunch, stack with turkey, greens, and a smear of mustard — and watch everyone’s face when they take that first bite. Serve with a simple tomato soup for chilly nights; it’s a match made in cozy heaven. Drinks? Coffee or a robust black tea works in the morning, while a crisp white wine or sparkling water is lovely for evening sandwiches. For dessert pairing, warm a slice, spread Nutella (or a hazelnut spread) and pair with vanilla ice cream — indulgent and not too fancy.
How to Store and Reheat Leftovers
Store at room temperature wrapped in a clean towel or in a bread box for up to 3 days. For longer storage, slice and freeze in a zip-top bag for up to 3 months. To refresh a day-old slice, toast directly from the fridge or wrap in foil and warm in a 350°F oven for 8–10 minutes. For frozen slices, toast straight from the freezer — it’s perfect for high protein microwave meals and quick breakfasts. Don’t refrigerate whole loaves — it speeds up staling.
Make-Ahead and Freezer Tips
Make-ahead is my favorite kind of magic. Bake loaves on a weekend and freeze slices for weekday mornings. Cool completely, slice, and place parchment between slices if you’re stacking to avoid sticking. For meal prep lunches, take out slices in the morning and they’ll be ready by lunchtime; toast or warm as needed. If you want to prepare dough ahead, you can retard the first rise by placing the dough in the fridge overnight — it develops more flavor and lets you bake fresh bread the next day.
Common Mistakes to Avoid
- Underproofing: Your loaf will be dense. Make sure it’s visibly puffy and passes a gentle poke test.
- Overproofing: Dough that’s overproofed may collapse in the oven. If it smells strongly alcoholic, it’s past its peak.
- Too much flour: Leads to a dry, crumbly loaf. Aim for slightly tacky dough.
- Cutting too soon: The crumb needs time to set. Patience pays.
- Neglecting your starter: Use a bubbly, active starter for the best rise and flavor.
Frequently Asked Questions (FAQ)
Q: Can I use instant yeast instead of sourdough starter?
A: Yes, but it becomes a different recipe. If using instant yeast, reduce rise times and skip the starter. The flavor profile will change (less tang).
Q: My loaf is gummy inside. What happened?
A: Likely underbaked or cut too soon. Ensure internal temperature reaches ~200°F, or bake a bit longer. Cool fully before slicing.
Q: Can I make a larger loaf?
A: Yes — scale ingredients proportionally and use a bigger pan. Watch rise times; larger loaves may need a bit more baking time.
Q: How do I know if my starter is active?
A: It should double in volume 4–8 hours after feeding and be bubbly with a pleasant tang.
Cooking Tools You’ll Need
- Large mixing bowl
- Clean kitchen scale (optional but recommended)
- Bench scraper or spatula
- Loaf pan (8.5 x 4.5-inch or similar)
- Oven thermometer (optional)
- Cooling rack
- Kitchen towel or plastic wrap
Final Thoughts
This loaf is proof that simple things can have big emotional returns. It’s the bread you slice for late-night grilled cheese emergencies, the loaf you bring to friends who need comfort, the vehicle for weekend brunch sandwiches. I love how it’s forgiving — you don’t need a perfect life to make great bread, just a willing starter and a willingness to embrace a little chaos. If your first loaf looks a little funny, laugh, toast it, and keep going. That’s how recipes become yours.
If you enjoyed this recipe, don’t forget to save it on Pinterest or share it with a friend!
Conclusion
If you want to compare techniques or get inspired by other people’s takes on the loaf, check out this helpful version on The Softest Sourdough Sandwich Bread recipe on Let’s Make Sourdough. For a slightly different approach with great photos and tips, see Easy Sourdough Sandwich Bread at The Clever Carrot. And for another beloved version with baking notes and variations, take a look at Amazing Soft Sourdough Sandwich Bread on Twelve On Main.
Happy baking, and remember — flour on your shirt is a badge of honor.

Homemade Sourdough Sandwich Bread
Ingredients
Main Ingredients
- 3 cups all-purpose flour Can substitute up to half with bread flour for a softer crumb.
- 1 cup water Use room temperature water; warmer if starter is refrigerated.
- 1/2 cup active sourdough starter Ensure the starter is bubbly and lively.
- 1 teaspoon salt Fine sea salt is preferred.
- 1 tablespoon sugar Can substitute with honey for deeper flavor.
- 2 tablespoons olive oil Use mild extra virgin or neutral oil.
Instructions
Preparation
- In a large bowl, mix flour, water, sourdough starter, salt, sugar, and olive oil until a dough forms.
- Let the mix sit for 10–15 minutes for autolyse.
Kneading
- Knead the dough for about 10 minutes until it feels smooth and elastic.
Bulk Rise
- Place the dough in a lightly oiled bowl, cover, and allow it to rise in a warm place for 4–6 hours or until doubled.
Shaping
- Punch down the dough and turn it out onto a lightly floured surface. Shape it into a loaf and let it bench rest for 10 minutes.
Final Rise
- Place the shaped dough in a greased loaf pan and let it rise for another 1–2 hours until puffed.
Baking
- Preheat oven to 375°F (190°C). Bake the loaf for 30–35 minutes until golden brown and the center reads about 200°F.
Cooling
- Let the loaf cool completely before slicing, at least an hour.