Easy Mexican Chocolate Shortbread Cookies: A Cozy Delight
There’s something about a cookie that’s infused with rich, dark chocolate and the warm spices of Mexico that makes my heart soar. Let’s be real—Mexican Chocolate Shortbread Cookies are not just any dessert; they are a loving hug presented on a beautiful plate. I first discovered this heavenly combination during one of my many late-night baking adventures, desperately searching for a way to satisfy a sweet tooth. I had just enough ingredients left from a weekend taco night, and the idea of mixing chocolate with spices sounded like a grand experiment. Spoiler alert: it turned out delicious!
Picture this: the smell of baking cookies wafting through the air, teasing my senses while I sip on a cup of hot cocoa. Now, add in the glow of my fairy lights strung around the kitchen—it was a scene strait out of a cozy holiday movie! It’s these kinds of moments that remind me why I love baking. It’s not just about enjoying the final product, but also about the entire experience—those delightful messes, the quiet chaos, the flour flurries dancing in the sunlight!
Oh, and let’s not forget the first batch of cookies that emerged from the oven slightly burnt on the edges. I didn’t expect that! But hey, in the spirit of baking, sometimes those little “oops” moments turn into the best memories, right? It took a few tries, but once I nailed down the balance of chocolate and spice, I knew I was onto something special.
These cookies are perfect for cozy evenings, but they are also a delightful treat for gatherings or to pack up as gifts. With the holidays fast approaching, you’ll want to have this recipe memorized! Trust me; they will be the talk of the party. Plus, they have a unique twist that sets them apart from ordinary shortbread cookies, combining the rich cocoa flavor with the warm notes of cinnamon and an optional kick of cayenne pepper for those who crave a little heat. Seriously, can you imagine biting into a cookie that’s both sweet and spicy? Yes, please!
Why You’ll Love This Recipe
- Easy and Quick: These cookies come together in a flash, making them an ideal option for easy weeknight dinners and desserts.
- Meal Prep Wins: Batch them up and store them in an airtight container for a delightful treat all week or to share with family and friends.
- Forever a Crowd-Pleaser: Picky-eater approval is guaranteed. Chocolate and cinnamon? You can’t go wrong here.
- Perfectly Satisfying: They feel like a warm hug on a cold day, and trust me, one is never enough!
- A Unique Twist: The inclusion of cayenne pepper brings a surprising depth that will have your taste buds dancing.
- Versatile and Customizable: This recipe plays well with others—you can dress it up or down!
What Makes This Recipe Special?
Ah, let’s talk about the secret magic that makes these cookies so special. The blend of rich cocoa and aromatic spices brings me back to those old-school churros dipped in hot chocolate (seriously, can you blame me?). The ground cinnamon adds warmth and familiarity, evoking cozy nights by the fireplace. Cayenne pepper is optional but recommended for those who like a little kick in their sweetness. The combination feels like a culinary love letter to both chocolate lovers and spice enthusiasts.
Beyond the flavors, there’s something about sharing these cookies with friends and family that deepens their uniqueness. Every batch becomes a memory, a moment shared over laughter and joy. There isn’t a gathering that doesn’t benefit from the addition of a plateful of these beauties. So, not only do they taste amazing, but they also build connections—like a sweet little bridge from my kitchen to your heart.
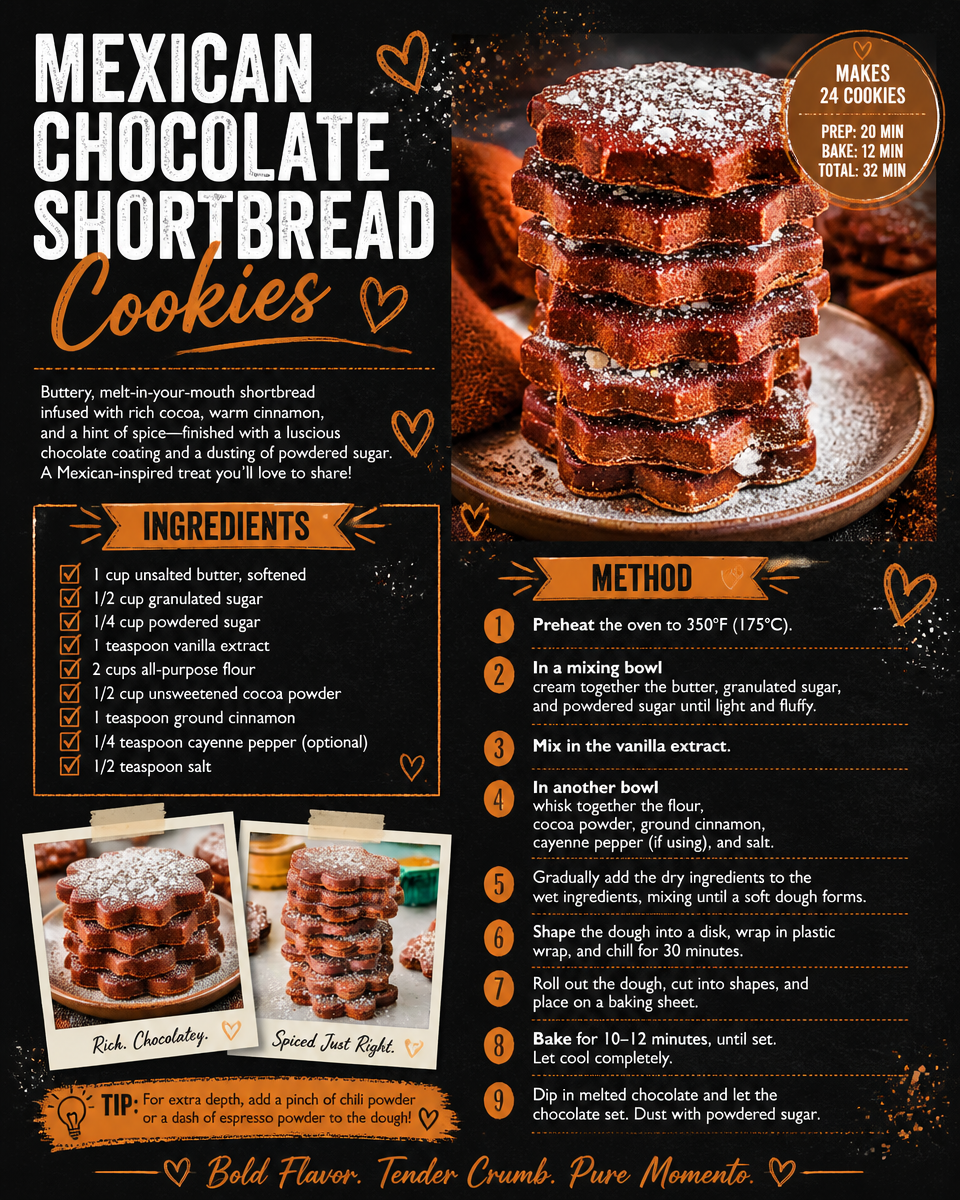
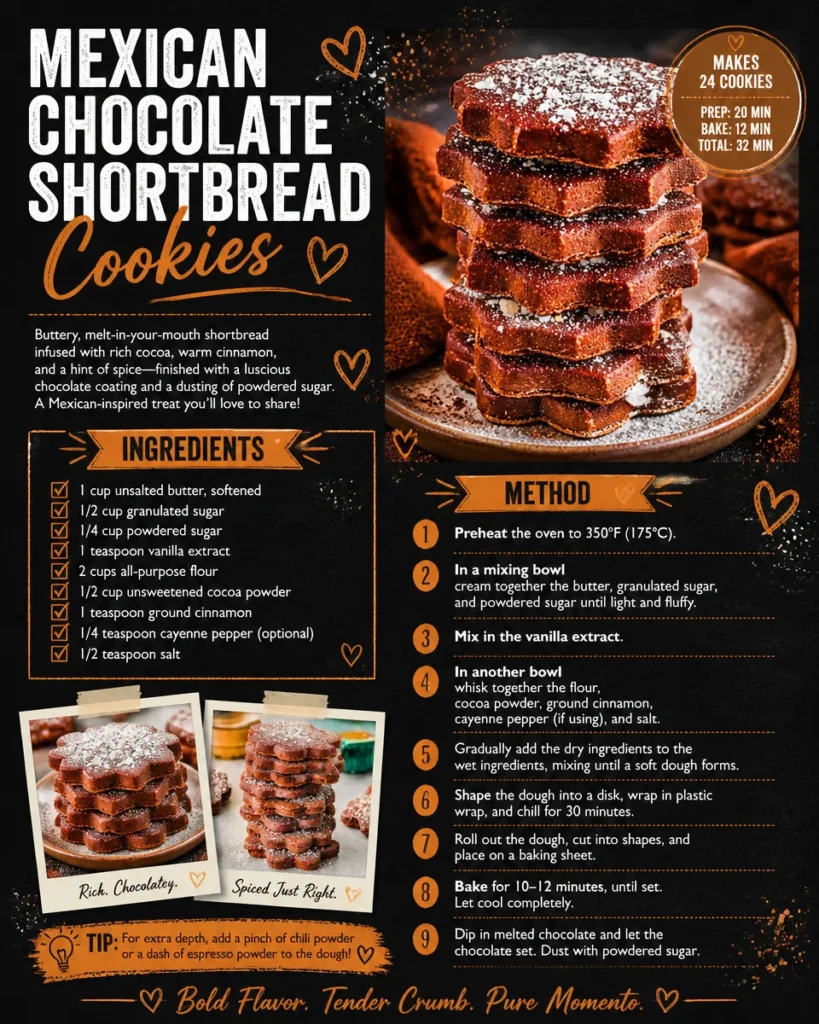
Ingredients
- 1 cup unsalted butter, softened: This adds richness and helps in achieving that melt-in-your-mouth texture.
- 1/2 cup granulated sugar: Sweetness is key! This balances the chocolate and spices.
- 1/4 cup powdered sugar: For that dreamy, smooth texture that makes shortbreads so delightful.
- 1 teaspoon vanilla extract: A dash of vanilla creates depth and rounds out flavors beautifully.
- 2 cups all-purpose flour: The base of our cookie, bringing it all together.
- 1/2 cup unsweetened cocoa powder: This is where the chocolate magic happens!
- 1 teaspoon ground cinnamon: Adding warmth and nostalgia—think cozy sweaters and warm drinks.
- 1/4 teaspoon cayenne pepper (optional): A fun twist for those daring enough to give their taste buds a little heat.
- 1/2 teaspoon salt: Essential to balance and enhance all the flavors!
Now, some personal tips: I recommend high-quality cocoa powder; it makes all the difference! Brands like Ghirardelli or Guittard elevate the flavor. Also, be careful when measuring flour; a little too much can lead to dry cookies. I once made the “more is better” mistake, and let’s just say, I should’ve written a tragic poem about my cookie demise.
How to Make It Step-by-Step
Alright, it’s go-time! Let’s roll up our sleeves and dive into the process. Here’s how to make these Mexican Chocolate Shortbread Cookies step-by-step. Trust me, you’ll want to savor every moment.
-
Preheat the oven: Set that sweet oven to 350°F (175°C). Why? Because a hot oven is the magical portal to cookie heaven, where buttery goodness and chocolate dreams come true.
-
Cream the butter and sugars: Grab a mixing bowl, and in goes the softened unsalted butter, granulated sugar, and powdered sugar. Using an electric mixer (or a good old-fashioned whisk, if you’re feeling strong), cream them together until the mixture is light and fluffy, resembling clouds. This should take about 3-5 minutes. Honestly, the sound of that mixer is music to my ears!
-
Mix in vanilla: Once it’s fluffy, add the vanilla extract. This step will have your kitchen smelling like a slice of heaven.
-
Time for dry ingredients: In another bowl, whisk together the all-purpose flour, cocoa powder, ground cinnamon, optional cayenne pepper, and salt. This is the “dry brigade” that will bring the flavors together perfectly. Mix until combined—no streaks of flour allowed!
-
Combine the mixtures: Gradually add the dry ingredients to the creamed mixture. As you do this, feel free to channel your inner cookie-seeking wizard. It’s time to get that dough to form—a good 3-5 minutes of mixing should do it. You’ll know it’s ready when it starts pulling away from the bowl’s sides.
-
Shape the dough: Once your dough is ready, it’s time to have a bit of fun! Roll the dough into 1-inch balls or shape it into discs. Who knew baking could be so creative? Place these little dough balls on a baking sheet lined with parchment paper, giving them some room to breathe.
-
Flatten it: Here’s where you can get artsy again! Grab a fork or just use your hands to flatten the cookies slightly. No need to press them down too much—just enough for a touch of flattening.
-
Bake to perfection: Pop that loaded baking sheet into the preheated oven and let them bake for 12-15 minutes. You’re looking for a “set but still soft” texture. Trust your nose—the aroma of baking chocolate will fill your kitchen, and you’ll be expecting your very own baking show moment if you’re lucky!
-
Cooling time: Take them out, but don’t be in a rush to eat just yet! Allow them to cool on the baking sheet for a few minutes. They need to firm up a bit before transferring them to a wire rack to cool completely. Besides, a smidge of patience never hurts!
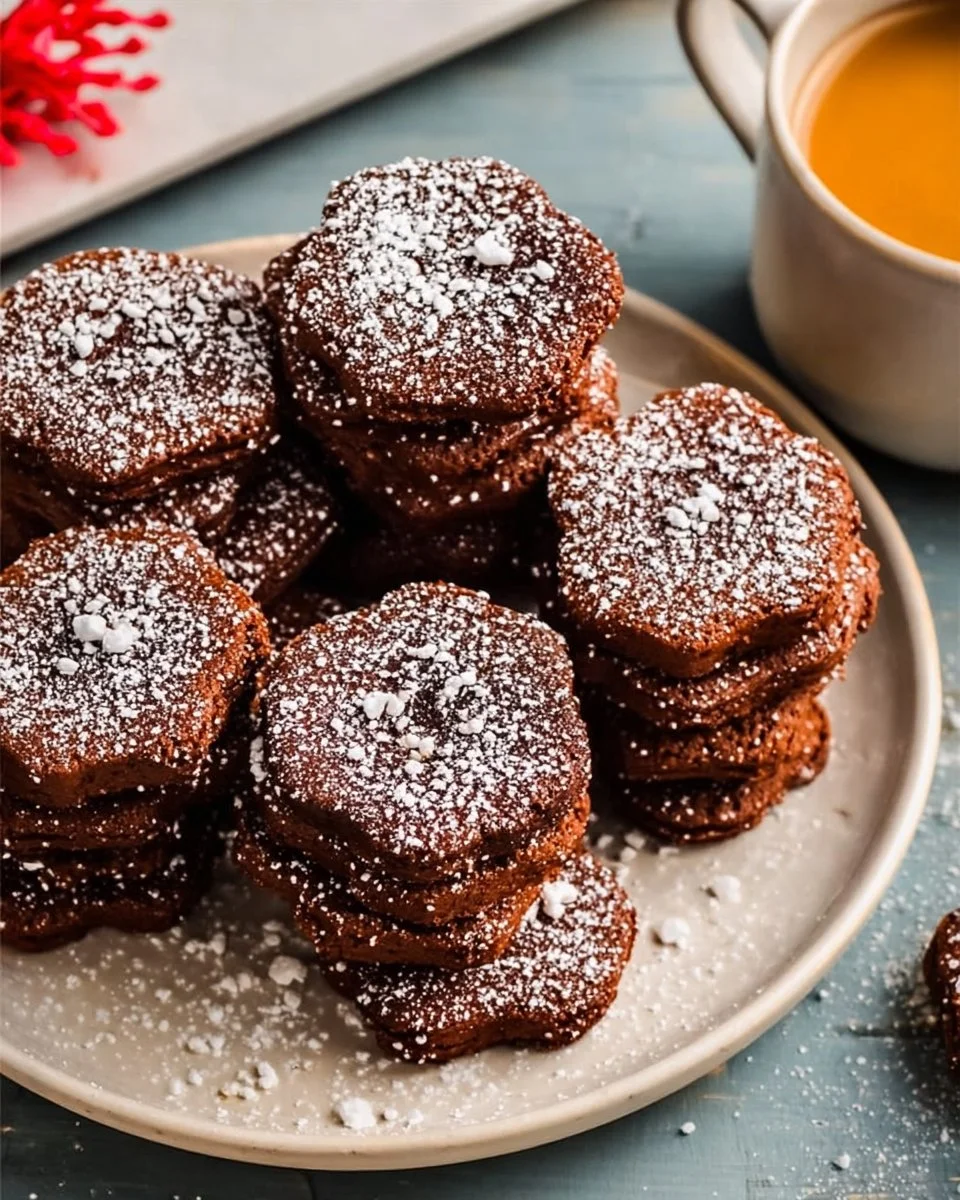
These cookies! Once they’ve cooled, the crispy, crumbly exterior gives way to a tender, chocolaty morsel, and biting into one is like entering a cozy, spiced dream. Each cookie is worth the little spills, sticky fingers, and flour clouds along the way. I swear, this recipe will be the highlight of your baking endeavors.
Tips for Best Results
- Room Temperature Butter: Always use softened butter. If you forget to take it out, the microwave can help—just warm it in short bursts to avoid melting.
- Don’t Overmix: Once your dough comes together, stop mixing—overworking it can lead to tough cookies, and we want tender, melt-in-your-mouth delights!
- Chill the Dough: If you’re in a hot kitchen, consider chilling the dough for about 30 minutes. This makes it easier to handle and can improve the texture.
- Variation is Key: Feel free to swap in chocolate chips or nuts to give these cookies a delightful twist. Exploring variations can lead to new kitchen adventures!
Ingredient Substitutions & Variations
- Gluten-Free Option: If you need a gluten-free variation, try using a 1:1 gluten-free flour mix. Most work well in cookie recipes!
- Butter Substitute: You can use coconut oil in place of butter for a slight flavor twist. Just ensure it’s in a solid state!
- Cocoa Alternatives: If you want to experiment, consider using a mix of dark and milk chocolate cocoa for richness without being too intense.
- Spice Variations: Swap cayenne pepper for a pinch of nutmeg or even a splash of espresso powder for a mocha-enhanced flavor.
Directions
Now, the fun part—pairing! These Mexican Chocolate Shortbread Cookies are delightful on their own, but a cup of coffee or spicy hot chocolate gives them a cozy partner. Can you picture it? A movie night or a rainy afternoon, snuggled up with a plateful of cookies, and feeling utterly content? Dreamy, right?
How to Store and Reheat Leftovers
Leftovers? Ha! If you’re anything like me, there won’t be many! For the rest of you, store these delectable cookies in an airtight container at room temperature for about a week. If you see them starting to get soft, pop them in the fridge for a while—they get a bit chewy, and who doesn’t love that?
If you’re looking to extend that cookie goodness, freeze the baked cookies in a single layer until solid, then layer them in freezer-safe bags. They’ll last for up to three months. When you want a cookie fix, just pop them in the oven at 300°F (150°C) for about 5-10 minutes, and they’ll taste just as fresh as day one!
Make-Ahead and Freezer Tips
You can pre-make the dough and shape it into balls, freeze them on a baking sheet, and once firm, store them in a freezer bag. When the craving strikes, bake them directly from the freezer, adding a minute or two to the baking time. It’s like having a cookie genie at your beck and call!
Common Mistakes to Avoid
- Butter Too Cold or Too Warm: If it’s too cold, it won’t cream properly, and if it’s too warm, you’ll end up with flat cookies. Aim for the sweet spot—soft, but not melting!
- Not Measuring Flour Correctly: Spoon it into cups and level rather than scooping. That’s a recipe for dry cookies. Trust me, I’ve been there!
- Overbaking: Cookies continue to cook on the baking sheet. If they look a bit soft, it’s okay! Just let them sit and firm up, and you will have perfectly chewy cookies.
Frequently Asked Questions (FAQ)
Can I use salted butter instead of unsalted?
Absolutely, but reduce the added salt by half for balance. The key is to avoid overwhelming sweetness!
Can I double the recipe?
Yes, this is a fantastic cookie to share! Just make sure you have a bowl big enough to handle all that deliciousness.
Can I add chocolate chips?
Definitely! Mix in some semi-sweet or dark chocolate chips for added decadence. Variety is the spice of life, after all!
What if I don’t have cayenne pepper?
No worries! You can omit it altogether or try a pinch of chili powder or even some crushed red pepper flakes for a different kick.
How do I know when the cookies are done?
Look for the edges to slightly firm up, but the centers should still be soft. They will harden as they cool.
Cooking Tools You’ll Need
- Mixing bowls
- Electric mixer or whisk
- Baking sheets
- Parchment paper
- Measuring cups and spoons
- Cookie scoop (optional, but helps with even sizing)
Final Thoughts
Baking isn’t just about the end product; it’s about the journey, the joy, and the delicious messes we create along the way. These Mexican Chocolate Shortbread Cookies hold a special place in my heart—making them brings back memories of cozy evenings, laughter with friends, and the joy of sharing a delicious treat. I hope they bring as much warmth and happiness to your home as they do to mine.
If you try these cookies (and I genuinely hope you do!), please let me know how it goes! I’d love to hear your twists, your stories, or even just a simple “yum!” as you indulge. And don’t forget, if you enjoyed this recipe, don’t forget to save it on Pinterest or share it with a friend! Happy baking!