Easy High-Protein Cheesecake Jars: A Delicious Dessert
I remember the first time I tried making cheesecake. It was more of a disaster than a culinary triumph. Picture me, an ambitious home cook, with my hair tied back and flour scattered across the kitchen like I was measuring out the ingredients for a scientific experiment. I went all out, following a complicated recipe that promised the “best cheesecake ever.” Spoiler alert: it was more like the “most epic cheesecake that never set.” The resulting dish resembled a pancake rather than a fluffy dessert. I learned some valuable lessons that day. But as with most things in life, the journey matters as much as the destination, doesn’t it?
Fast forward a few years, countless baking attempts, and maybe a few more kitchen disasters, and I’ve discovered my beloved High-Protein Cheesecake Jars. These little delights are a game-changer. They’re incredibly easy, budget-friendly, and they make for a wholesome dessert without the guilt of traditional cheesecake. Seriously, have you ever experienced that blissful moment when you bite into something creamy that tastes like heaven but also happens to be a high-protein meal? That’s what these jars give you!
On a cozy evening, the scent of lightly toasted graham crackers wafting through your kitchen can make you feel like you’re wrapped in a warm blanket. As you mix the ingredients for the filling, the creamy texture of the softened cream cheese combined with the sweetness of honey or maple syrup dances in your senses, setting the stage for kitchen magic. I won’t lie, pouring the mix into jars feels a bit like a spa treatment for your taste buds. The anticipation builds as you pop those jars into the fridge, and the thought of topping them off with fresh strawberries is enough to make my heart skip a beat.
Why do I adore this recipe, you ask? Well, let me count the ways.
Why You’ll Love This Recipe
-
Healthy Comfort Food: Who doesn’t crave comfort food that’s actually good for you? The creamy, rich texture makes it feel indulgent, while the high protein keeps it on the healthy side.
-
Meal Prep Darling: These jars can be prepped ahead and stored in the fridge for easy grab-and-go snacks or desserts throughout the week. If you’re like me, trying to balance work, life, and the occasional Netflix binge, this is a huge win.
-
Picky-Eater Approved: If you’ve got kids or a picky partner, these cheesecake jars are perfect. They’re small, easy to eat, and totally customizable. Toss in some chocolate chips for the little ones or switch up the fruit toppings!
-
Perfect for a Cozy Night In: A rom-com, a comfy blanket, and some of these high-protein cheesecake jars? Honestly, perfection.
-
Unique Flavor Profile: Using Greek yogurt and protein powder not only adds a health twist but also elevates the flavors, creating a creamy delight that surprises – plus it makes it a fantastic option for those who are into high protein meals.
This recipe isn’t just about taste; it’s about the memories you create while making it. It’s about feeling like a culinary wizard when you pull those jars from the fridge, and the creamy layers gleam invitingly. Seriously, what’s not to love?
What Makes This Recipe Special?
The beauty in these jars doesn’t just lie in their deliciousness but also in their simplicity. With just a few ingredients, I feel like a culinary magician, transforming mundane items into something extraordinary. The combination of cream cheese, Greek yogurt, and protein powder makes this cheesecake rich in flavor without the heaviness of a traditional dessert.
And can we take a moment to discuss the graham cracker crust? I mean, it’s classic for a reason! The crunch is the perfect contrast to the creamy filling. Plus, the smell emanating from the toasted crust makes even the most mundane Wednesday feel like a special occasion.
Every bite of this cheesecake brings back memories of my childhood adventures in the kitchen, where I learned that cooking is both an art and a science. And trust me, this recipe encompasses both worlds beautifully.
Ingredients
-
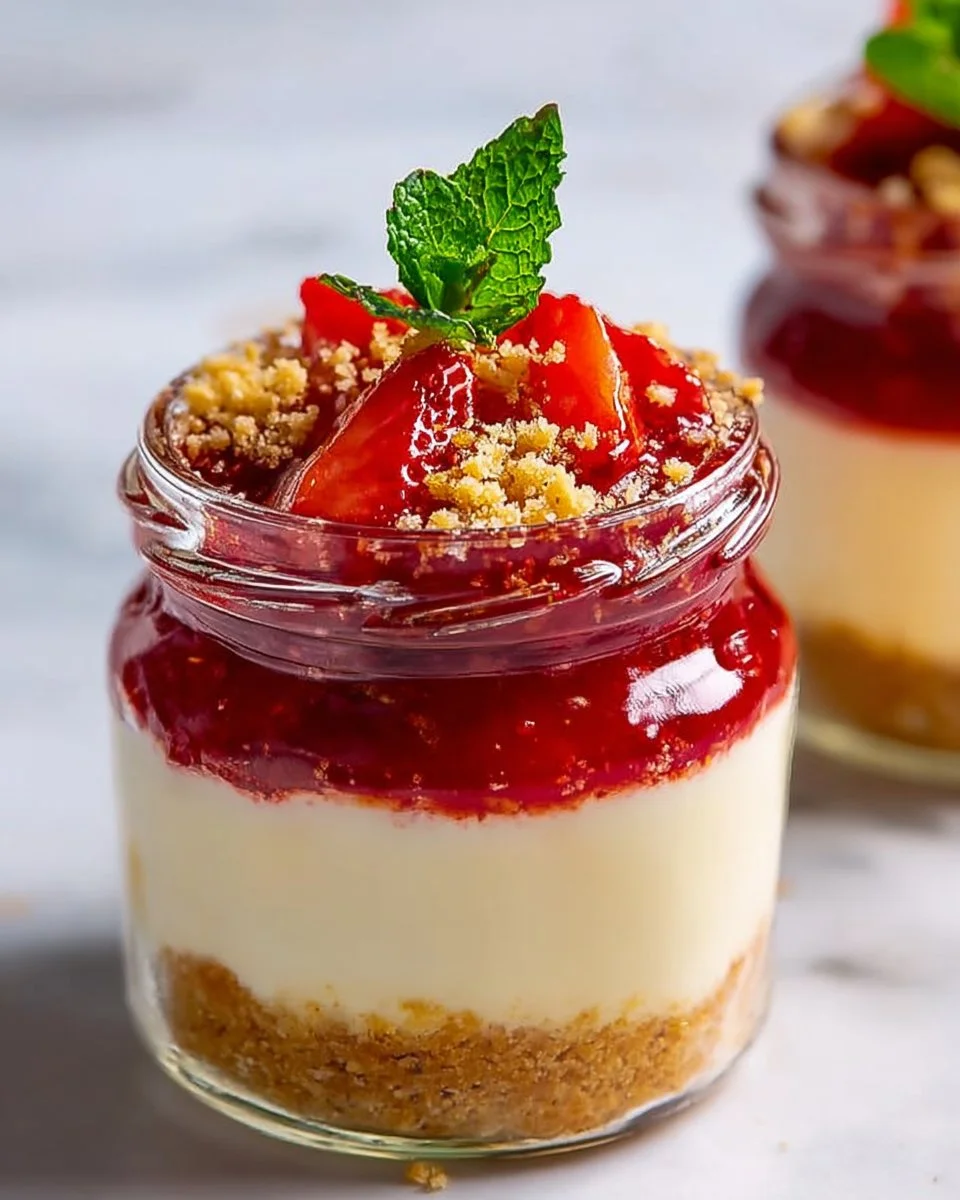
1 cup graham cracker crumbs: This will form the delightful crust. It adds texture and sweetness. I always go for the traditional brand, but feel free to use generic ones if budget is a concern!
-
1/4 cup melted butter: You need the butter to bind those crumbs together. Don’t be afraid to use unsalted butter; that’s my go-to for almost anything.
-
1 cup cream cheese, softened: This is where the magic starts! Aim for full-fat cream cheese for the best texture. Make sure it’s well-softened. You don’t want to be wrestling with lumps in your mixer!
-
1/2 cup Greek yogurt: This adds a tang that balances the sweetness and increases the protein content. Choose the plain, unsweetened variety to keep sugar in check.
-
1/2 cup protein powder (vanilla or unflavored): It’s essential for that high-protein kick. Sometimes I experiment with flavored protein powders for a twist!
-
1/4 cup honey or maple syrup: Sweetness! I usually go for honey, but if you’re vegan or prefer maple, it works perfectly too.
-
1 teaspoon vanilla extract: A must-have for depth of flavor. Don’t skimp here; it makes a huge difference!
-
Fresh strawberries for topping: These make the jars pop! It’s not just for looks; the freshness contrasts beautifully with the creamy filling. If strawberries are out of season, you can also try blueberries or raspberries.
Tips: Make sure your cream cheese is at room temperature. Oh, and a friendly reminder: when you’re measuring the graham cracker crumbs, I advise you not to overpack them. A light hand allows for a perfect crust.
How to Make It Step-by-Step
Alright, let’s dive into the glorious world of cheesecake jar-making! I’ve got to tell you, don’t stress; it’s actually much easier than it sounds.
-
Prep Your Jars: First things first, gather your jars. I go for the little mason jars because they’re cute and totally Instagram-worthy. Clean and dry them, then set them aside.
-
Make the Crust: In a mixing bowl, combine the graham cracker crumbs with the melted butter. The texture should resemble wet sand. Honestly, a wooden spoon is cool, but sometimes I just use my hands (messy chef alert!). Make sure everything is combined well, then pour this mixture into the bottom of the jars. Use the back of a spoon or your fingers to press it down firmly. Oops! Don’t forget to keep it even.
-
Create the Cheesecake Mixture: In a second bowl, beat the softened cream cheese until it’s super smooth. A hand mixer or stand mixer works wonders, but honestly, if you’re feeling adventurous, whisk it by hand and get a workout at the same time! Oh, the joys of multitasking! Once it’s smooth, mix in the Greek yogurt, protein powder, honey, and vanilla extract. Just a friendly reminder: no lumps allowed, folks! If you encounter some, keep on mixing.
-
Layer It Up: Now, spoon the luscious cheesecake mixture over your crust in the jars. I like to be generous here; you want a hearty portion! Leave a little space at the top to prevent spills. Besides, who doesn’t love a giant scoop of cheesecake?
-
Set It to Chill: Cover each jar and pop them in the fridge. They need to chill for at least 2 hours to set properly. I know, waiting is tough, but trust me, it’s worth it! In the meantime, go watch that episode of your favorite show you’ve been saving.
-
Finish with Freshness: When you’re ready to serve, slice up some fresh strawberries and top your jars. This step is basically the cherry on top—but with strawberries, let’s be real!
Tips for Best Results
- Let your cream cheese soften completely for an ultra-smooth filling.
- Taste as you go! Don’t be afraid to add a pinch of salt or an extra drizzle of honey if you want a sweeter kick.
- Chill them overnight if you can, as the flavors meld beautifully.
- For a little flair, try garnishing with chopped nuts or a sprinkle of cocoa powder if you’re feeling adventurous.
Ingredient Substitutions & Variations
If you want to mix it up a bit (because who doesn’t love new flavor ideas?), here are a few easy swaps:
- Different Sugar Sources: Instead of honey or maple syrup, you can use agave nectar or stevia to cut down on sugar for a low-calorie healthy dessert.
- Dairy-Free Options: Swap out the cream cheese with a vegan cream cheese and use coconut yogurt instead. It gives a tropical twist that’s refreshing!
- Fun Flavors: Toss in lemon zest for a bit of zing, or mix in some peanut or almond butter for a nutty twist. Yum!
Directions
- Combine graham cracker crumbs and melted butter, then press into jars to form a base.
- Beat the cream cheese until smooth, then add Greek yogurt, protein powder, honey, and vanilla extract, mixing until well combined.
- Spoon the cheesecake mixture over the crust in jars.
- Refrigerate for at least 2 hours to set.
- Top with fresh strawberries before serving.
Pairing Ideas (Drinks, Sides, Etc.)
These jars are great on their own, but how about enjoying them while watching a feel-good movie? I recommend pairing them with a warm cup of chamomile tea or a light spritzer. If you’d like to go all out, consider a fresh fruit platter on the side. So summery!
How to Store and Reheat Leftovers
If you happen to have any jars left (though I can’t promise they’ll last long), keep them in the fridge, where they can last up to a week. Just make sure they’re sealed tightly! If you made a big batch and need to store them longer, they can actually be frozen for up to a month. Just be sure to thaw them overnight in the fridge before enjoying again!
Make-Ahead and Freezer Tips
These jars are perfect for meal prep. If I’m anticipating a busy week ahead, I’ll whip up a few batches on Sunday nights. Just make sure to keep the toppings separate until ready to serve to keep them fresh!
Common Mistakes to Avoid
- Lumps in Mixture: Make sure your cream cheese is soft. If it’s coming straight from the fridge, you’ll end up wrestling with lumps.
- Unsuitable Containers: Avoid using jars that can’t handle changes in temperature. Glass mason jars are typically a safe choice!
- Skipping the Chill Time: Please resist the urge to dig in immediately. As tempting as it may be, these jars will taste far better after they’ve had some time to set.
Frequently Asked Questions (FAQ)
-
Can I use flavored protein powder?
Absolutely! Vanilla works best for the classic taste, but chocolate or strawberry can add a unique flair. -
What if I don’t have graham crackers?
Crushed cookies or digestive biscuits can work too. Just look for something crunchy! -
Are these jars suitable for kids?
Definitely! The high protein and low sugar make them an excellent choice for kids, and the fun jars make any dessert appealing. -
Can I make this vegan?
You can! Use plant-based cream cheese and yogurt, and you’re set for a delicious vegan treat. -
What’s the best way to serve these jars?
They’re delightful as snacks or after dinner. For a fun twist, organize a mini cheesecake bar with assorted toppings.
Cooking Tools You’ll Need
- Mixing bowls
- Hand mixer or stand mixer
- Measuring cups and spoons
- Jars (mason jars are perfect!)
- A rubber spatula (for scraping down the sides)
Conclusion
These High-Protein Cheesecake Jars have become a staple in my kitchen, marrying health and indulgence in a delightful way. It’s hard to beat the satisfaction of creating something this delicious with just a handful of ingredients! And the best part? You’re always just a spoonful away from happiness.
If you’re looking for more delicious twists on cheesecake, I highly recommend checking out this fantastic take on the classic Classic Cheesecake with Raspberry Sauce or diving into Chocolate Chip Cookie Dough Cheesecake. If you’re in the mood for some fruity goodness, try High-Protein Strawberry Cheesecake Jars for a refreshing summer treat!
So there you have it! I’d love to hear your thoughts and any creative twists you’ve added to these jars. If you enjoyed this recipe, don’t forget to save it on Pinterest or share it with a friend!