Easy Chocolate Sugar Cookie Bars: Sweet Comfort in Every Bite
Let me set the scene for you. It was a chilly evening, the kind where the wind just loves to whip at your windows, and I was cozied up in my kitchen, wearing my go-to fuzzy socks that have seen better days (a little embarrassing, to be honest). I had a serious craving for something sweet and chocolatey that felt like it could hug my insides. Enter, my Chocolate Sugar Cookie Bars—a recipe that has a special place in my heart.
I remember stumbling upon this delightful treat during my college years. I was tasked with bringing a dessert to a potluck (the pressure!), and I had the brilliant idea to experiment with sugar cookies. Well, let me tell you, it was a messy kitchen showdown. Flour clouds exploded in my face, and I even lost a spatula in the process—who knew they could fly? But the result? A softened, chocolate-infused bar that was far from sad. It was a crowd-pleaser, and I’ve been making it ever since.
Baking this recipe is like inviting a warm, sweet hug into your home. The aroma of melting chocolate and sugar fills every corner, coaxing smiles from even the grumpiest family members. I can’t pinpoint exactly why this recipe stays relevant in my rotation. Perhaps it’s the way the chocolate bars seem to bring everyone together, or maybe it’s because they just taste delightful. Trust me, each bite transports me back to those cozy nights of my college days, reminding me that sometimes the simplest things, like cookie bars, can create the most beautiful memories.
So, grab your apron and let’s embark on this chocolaty adventure that honestly requires just a bit of patience (and a little love). You’ll love how easy it is to make despite the cozy chaos that might come along—because who doesn’t appreciate a good dessert story?
Why You’ll Love This Recipe
- Simplicity: With just a handful of ingredients, you can whip up these cookie bars without feeling like you’ve just signed up for a baking Olympiad.
- Crowd-Pleaser: I’m telling you, this dessert garners the biggest smiles and “mmm” sounds around the dining table. Perfect for parties or just a Netflix night in!
- Leftover Love: These cookie bars last for days (if they even make it that long). They’re also perfect to store and reheat for a midnight snack—who needs healthy late-night snacks when you can have this?
- Perfect for Meal Prep: You can make them ahead of time and freeze, giving you a quick sweet treat whenever the craving hits.
- Versatile: Want a holiday twist? Add some peppermint extract! Feeling extra decadent? Top with ice cream! You can let your creativity run wild (and trust me, no one will judge you).
- Comforting: There’s something deeply soothing about indulging in a warm chocolate treat, either while binge-watching your favorite show or wrapped up in a good book.
What Makes This Recipe Special?
Honestly, the magic lies in the blend of simple ingredients that come together in the most delicious way. Each component plays its part with precision. The combination of brown and granulated sugars ensures that the bars remain moist and chewy, while the unsweetened cocoa powder brings forward that rich chocolate flavor that’s almost sinful. To top it off, we’re drenching the bars in a luscious chocolate frosting that you’ll want to spread on everything.
And let’s not forget the nostalgia! The moments of laughter and chaos when my friends and I would stand around the kitchen, stirring the mixture and tasting the chocolate chips (oops!). Those little memories remind me why I love cooking so much—it’s as much about the food as it is about the people we share it with.
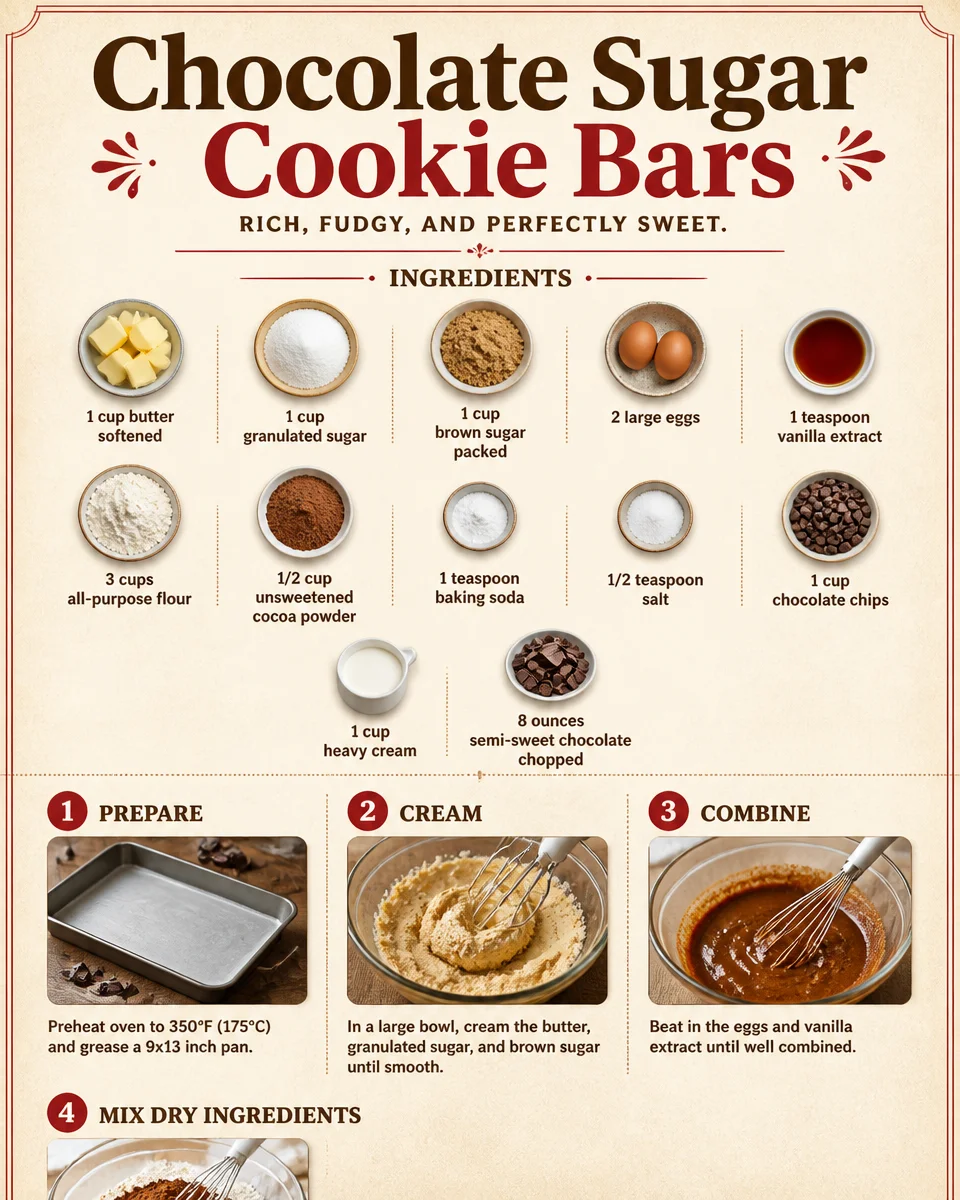
Ingredients
-
1 cup butter, softened: The star of the show that provides that rich, buttery flavor. Always using unsalted here; you can control the saltiness that way.
-
1 cup granulated sugar: Sweetness factor! It helps create that beautiful texture. I go for cane sugar most of the time for its purity.
-
1 cup brown sugar, packed: This is where the magic happens. It adds moisture and gives a deeper flavor profile—don’t skimp on it!
-
2 large eggs: Essential for binding! If you’re feeling adventurous, flax eggs work just as well here for a vegan twist.
-
1 teaspoon vanilla extract: The secret ingredient that elevates every dessert. Always opt for pure vanilla, trust me, it’s worth it.
-
3 cups all-purpose flour: It might sound like a lot, but it balances out the chocolate element beautifully. Measure accurately to keep your texture on point.
-
1/2 cup unsweetened cocoa powder: Offers that intense chocolate flavor. Don’t be tempted with sweetened; you want to control the sweetness.
-
1 teaspoon baking soda: Helps the bars rise perfectly without becoming too cake-like.
-
1/2 teaspoon salt: Just a pinch to enhance all those flavors.
-
1 cup chocolate chips: Go ahead, use your favorite! Dark, semi-sweet, or even white chocolate—whatever floats your boat!
-
1 cup heavy cream: For that luxurious frosting, trust me, you want the heavy stuff here.
-
8 ounces semi-sweet chocolate, chopped: This is the pièce de résistance! Melting chocolate adds rich flavor.
If I had to give one piece of advice, it would be to always taste as you go. You’ll learn so much from your ingredients, and it helps ensure everything balances out well. I can’t tell you how many times I’ve made adjustments as I went along—like sneaking in extra cocoa powder because, duh, more chocolate!
How to Make It Step-by-Step
Alright, let’s dive into the fun part! Grab your mixing bowls and spatulas.
-
Preheat your oven to 350°F (175°C). While you’re waiting for it to warm up, grease a 9×13 inch baking pan. Trust me, you don’t want these beauties to stick (been there, done that).
-
In a large bowl, cream the butter, granulated sugar, and brown sugar until smooth. This is the moment to get some elbow grease in there—mix until it’s all combined and light. You want to see that color starting to change; it’s a thing of beauty!
-
Next, beat in the eggs and vanilla extract. The mixture will get a bit runny, don’t worry—it’s supposed to! This part is fun; the sweet scent of vanilla should be enveloping your kitchen by now.
-
In another bowl, whisk together the flour, cocoa powder, baking soda, and salt. Make sure there are no lumps! You’ll blend those dry ingredients together to counteract the mushy mess you just created.
-
Gradually add the dry ingredients to the wet mixture, mixing until just combined. Over-mixing can lead to dense bars, and honestly? That’s a mistake I’ve made before. It’s a balance—don’t be afraid to feel that soft, doughy goodness as you fold it in.
-
Now, it’s time to fold in the chocolate chips! You should be getting a mouth-watering scent by now. The dough will start to resemble something divine, and it’s all I can do to not snack on it right then and there.
-
Spread the cookie dough evenly in the prepared pan. Use a spatula—it keeps things tidy, and who needs extra cleanup?
-
Bake for 20-25 minutes or until a toothpick comes out clean—this part gets really suspenseful! But remember, you want those edges to look set while the center remains slightly gooey. Do an internal dance while you wait!
-
Let cool completely. I know, waiting is the hardest part, but it’s so worth it. You don’t want to ruin that frosting by melting it, right?
-
For the frosting, heat the cream in a saucepan until it just starts to simmer. That slight bubbling? It’s music to a baker’s ears. Pour the cream over the chopped chocolate in a bowl and let it sit for 5 minutes, then stir until smooth.
-
Spread the chocolate frosting over the cooled cookie bars. Silky, luscious frosting never felt so good. Let it set for a bit before slicing into squares—trust me, patience pays off!
Honestly, if I learned one lesson from this delightful journey, it’s to embrace the chaos and know that the mess often leads to the best of results. If your dough gets a little too thick? Maybe throw in a splash of cream. If you feel like experimenting with a bit of espresso powder for that extra kick? Go for it. That’s what makes baking fun!
Tips for Best Results
-
Don’t skip the chilling step for the frosting! If you pour it on too soon, it’ll just slide right off, and we’re not trying to create a chocolate waterfall here.
-
Check your oven’s temperature! Ovens can be sneaky little devils sometimes, and you want to ensure your delicious cookie bars bake evenly. An oven thermometer isn’t that pricey!
-
Adjust your baking time based on your pan type. Using a glass dish? You’re going to want it to bake a little longer. Metal pans go quicker, so keep an eye out!
Ingredient Substitutions & Variations
Feeling adventurous? Here are some fun twists for your cookie bars:
-
Nut Butters: For a nutty flavor, add a swirl of peanut or almond butter into the cookie dough before baking—unexpected and really tasty!
-
Add-Ins: Crushed pretzels, toffee bits, or even dried fruit can add a delightful surprise to your bars. Just remember to cut back a little on the chocolate chips.
-
Frosting Swap: Swap the chocolate frosting with a cream cheese glaze for a fun twist. Just blend cream cheese, powdered sugar, and a bit of vanilla.
-
Glimmer of Spice: A sprinkle of cinnamon or chili powder can give a cozy autumn vibe to the chocolate. You might just find it to be your new favorite!
Directions
- Preheat your oven to 350°F (175°C) and grease a 9×13 inch pan.
- In a large bowl, cream the butter, granulated sugar, and brown sugar until smooth.
- Beat in the eggs and vanilla extract until well combined.
- In another bowl, whisk together the flour, cocoa powder, baking soda, and salt. Gradually add the dry ingredients to the wet mixture, mixing until just combined.
- Fold in the chocolate chips.
- Spread the cookie dough evenly in the prepared pan.
- Bake for 20-25 minutes or until a toothpick comes out clean.
- Let cool completely.
- For the frosting, heat cream in a saucepan until it just starts to simmer. Pour over chopped chocolate in a bowl and let sit for 5 minutes, then stir until smooth.
- Spread the chocolate frosting over the cooled cookie bars and let set before cutting into squares.
Pairing Ideas (Drinks, Sides, etc.)
Let’s be real—these cookie bars are like a warm hug in your hand, but the right pairing makes them even more special. Here are a few ideas to elevate your dessert experience:
-
Milk or Dairy Alternatives: Nothing screams comfort like a tall glass of milk. Almond or oat milk pairs nicely too, especially if you’re going for a nutty undertone.
-
Coffee or Espresso: There’s something divine about chocolate and coffee. A strong cup of joe will elevate the rich flavors beautifully!
-
Ice Cream: Who can resist a scoop of vanilla or mint chocolate chip on top? Seriously, it’s like a party for your taste buds.
-
Rom-Coms: Honestly, if there’s a pairing more perfect than cookie bars and a cozy blanket while watching a rom-com, then I haven’t discovered it yet. Pure bliss.
How to Store and Reheat Leftovers
Not that I think there will be any leftovers (let’s be real here), but if you do find yourself with an extra square or two, store them in an airtight container at room temperature for up to five days. If you’re like me and want to relish in the chocolate goodness later, you can also freeze them! Just slice them up, wrap them tightly in plastic wrap, and toss them in a zip-lock baggie. They freeze beautifully!
Make-Ahead and Freezer Tips
Baking these cookie bars ahead of time is a total game-changer! You can prep the dough up to 2 days in advance and keep it in the fridge. When you’re ready to bake, just spread it into the pan and pop it in the oven. Perfect for when you know you’ll have a bustling week ahead!
Common Mistakes to Avoid
-
Forget to adjust for your oven: Every oven is different. If it’s your first time baking these, check them at the 20-minute mark to avoid overcooking.
-
Skip the cooling time: Letting your cookie bars cool completely is crucial for the frosting to set properly and for the perfect slice.
-
Accurate Measuring: Being off by even a tablespoon can impact the texture. Use dry measuring cups for flour and cocoa powder for accuracy.
Frequently Asked Questions (FAQ)
Q: Can I replace the chocolate frosting with something else?
A: Absolutely! A cream cheese frosting or even whipped cream works beautifully!
Q: How can I make these vegan?
A: Use flaxseed eggs for the regular eggs and substitute with vegan butter and dairy-free chocolate.
Q: Can I use whole wheat flour?
A: You can, but keep in mind it will slightly change the texture. You might want to mix half and half with all-purpose for the best results.
Q: What if I don’t have chocolate chips?
A: No problem! Chopped chocolate bars or even M&M’s can work just as well.
Cooking Tools You’ll Need
- Mixing bowls
- Measuring cups and spoons
- Spatula
- Whisk
- Baking pan (9×13 inch)
- Sharp knife for cutting
Final Thoughts
This Chocolate Sugar Cookie Bars recipe isn’t just a dessert; it’s a creation filled with warmth, laughter, and a sprinkle of chaos. Every bite echoes with memories and makes for a perfect moment—whether it’s a cozy night in or a gathering with loved ones.
So now that you have this amazing recipe, I can’t wait to hear your version of it! Did you tweak it? Add a dash of your creativity? If you enjoyed this little adventure in baking, don’t forget to save it on Pinterest or share it with a friend! Now get baking, and let those sweet scents waft through your home!