Easy Carrot Cake Cheesecake Bars: A Cozy, Delicious Treat
There are certain recipes that just feel like a warm hug. You know the ones I mean? Those that bring back fond memories of baking with a loved one or snuggling up on a rainy afternoon, indulging in a slice of something sweet. One of those recipes for me is the Carrot Cake Cheesecake Bars. Honestly, it’s a clever combination that brings together the nostalgia of carrot cake and the creamy indulgence of cheesecake into perfectly portable bars. It’s like two of my favorite desserts had a delightful baby—and I’m here for it!
The first time I attempted to make these bars was a splendid kitchen disaster. I was so excited, the sun was shining through the window, and I just knew I was going to create something culinary magic. Whipping up that carrot cake batter filled my home with the delectable aroma of warm spices, making me feel all sorts of cozy. But then, the chaos ensued. As I was trying to mix in the cream cheese filling, I accidentally knocked a bowl of carrots off the counter. Let me tell you, cleaning grated carrots off my kitchen floor was not how I envisioned this baking session going! But through the mess and laughter, I learned that it’s all part of the fun, right?
This recipe came into my life at a time when I desperately needed comfort food. Think rainy days, warm blankets, and binge-watching my favorite shows. It quickly became a staple—not just for me, but for friends who would drop by. Every slice is like a little celebration of flavors—sweet, spicy, and oh-so-comforting. Whether it’s a casual weeknight dinner or a special occasion, these bars are sure to impress.
So, if you’re looking for something to brighten your day or your dinner table, keep reading. These bars are cozy, scrumptious, and surprisingly easy to whip up!
Why You’ll Love This Recipe
-
Comfort in Every Bite: With the aromatic spices and sweet carrots, every bite feels like a hug. Seriously, it’s the definition of cozy food!
-
Easier than You Think: You might think cheesecake bars are a hassle, but the truth is, this recipe is straightforward and totally doable—even for kitchen novices.
-
Picky Eater Approved: It’s amazing how sneaking in veggies like carrots makes these bars feel a tad healthier, and I can almost guarantee that even the pickiest eaters will love them!
-
Great for Leftovers: If you happen to have any leftovers (which, let’s be honest, is a big “if”), they keep well in the fridge and make for a delicious snack all week.
-
Versatile: Whether you want to serve these at a dinner party, a casual get-together, or just as a sweet treat for yourself, they fit the bill!
What Makes This Recipe Special?
The beauty of the Carrot Cake Cheesecake Bars lies in their unique flavor combination. You get the spiced sweetness of the carrot cake blended with the creamy richness of the cheesecake—it’s like a delightful flavor explosion in your mouth! The hint of cinnamon and nutmeg awakens your senses, while the cream cheese layer introduces a satisfying smoothness.
This recipe also holds a special place in my heart because it reminds me of family gatherings. Every Easter or holiday gathering, you could find a carrot cake on the dessert table, always begging to be sliced. Adapting it into a bar format makes it so much more fun; they’re easy to serve, and let’s be real, we all love finger foods!
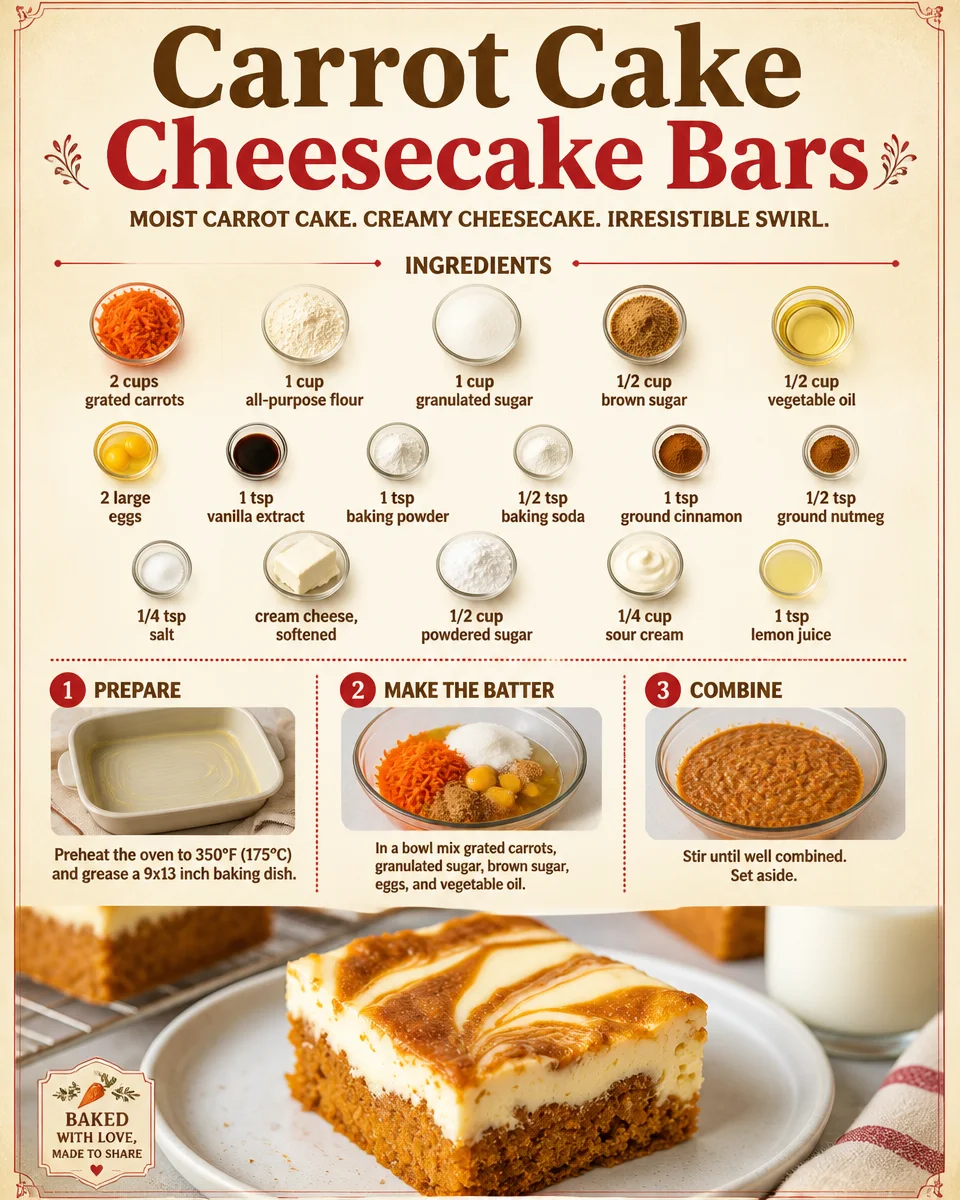
Ingredients
So, let’s talk about what you need for these perfectly spiced bars. Here’s the lineup:
-
2 cups grated carrots: Packed with nutrients and natural sweetness, these are the star of the show. Use fresh carrots and grate them yourself for the best texture.
-
1 cup all-purpose flour: This brings structure to our bars; it’s the base that holds everything together.
-
1 cup granulated sugar + 1/2 cup brown sugar: The sugars work in tandem to give these bars the perfect balance of sweetness, along with that lovely, caramel-like depth from the brown sugar.
-
1/2 cup vegetable oil: Adds moisture and richness. Trust me; no one wants a dry carrot cake!
-
2 large eggs: These bind the ingredients beautifully and add to the fluffiness.
-
1 tsp vanilla extract: A little splash of vanilla goes a long way in enhancing the overall flavor.
-
1 tsp baking powder + 1/2 tsp baking soda: This duo creates the rise we need in our carrot cake base.
-
1 tsp ground cinnamon + 1/2 tsp ground nutmeg: Classic spices that give carrot cake its iconic flavor profile.
-
1/4 tsp salt: A pinch of salt balances sweetness—it’s a must!
-
8 oz cream cheese: This is the creamy layer that elevates our bars. Bring it to room temperature for easy mixing.
-
1/2 cup powdered sugar: This sugar gives the cheesecake layer its sweetness while keeping it smooth.
-
1/4 cup sour cream + 1 tsp lemon juice: Both add creaminess and a hint of tang, complimenting the sweetness.
Just a little warning: make sure your cream cheese is softened! I learned this the hard way. Attempting to mix cold cream cheese is a workout no one signed up for!
How to Make It Step-by-Step
Alright, let’s jump into the cooking phase! Grab your mixing bowls and your favorite wooden spoon (or electric mixer if you want to go the extra mile) because we’re going to create something magical.
Step 1: Preheat and Prepare
Start by preheating your oven to 350°F (175°C). Grease a 9×13 inch baking dish generously; nobody wants their delicious creation to stick. If you have parchment paper, lining the dish is a great way to ensure easy removal after baking.
Step 2: Carrot Cake Batter Mix
In a large mixing bowl, combine grated carrots, granulated sugar, brown sugar, vegetable oil, eggs, and vanilla extract. You are going to have a vibrant, colorful mixture that smells fantastic! Like, seriously, I could almost bottle this smell and wear it as perfume.
Mix these together until well blended. It’s okay if it looks a little messy—trust me, that’s part of the charm!
Step 3: Dry Ingredients
Now, grab another bowl and whisk together your flour, baking powder, baking soda, cinnamon, nutmeg, and salt. It’s so lovely how the spices dance together in this step. Just be careful; the flour tends to puff up. Oops! I may have mistimed my first whisking, and a cloud of flour ended up on my kitchen ceiling. Who knew I could create art like that?
Now, gradually add the dry ingredients into the wet carrot mixture. Just fold it together until it’s combined. Don’t overmix; no need to be fancy here!
Step 4: Cheesecake Mixture
Next, in a third bowl, beat your cream cheese, powdered sugar, sour cream, and lemon juice until it’s all smooth and silky. The texture should feel indulgent and creamy—not lumpy!
Step 5: Layering
Now comes one of my favorite parts. Pour half of the carrot cake batter into your prepared dish and spread it evenly. Then, gently dollop the cheesecake mixture over this layer. Spread it all the way to the edges!
Now, pour the remaining carrot cake batter on top, covering the cheesecake layer, and then the fun part begins: use a knife to swirl the two mixtures together. Don’t overdo it; the goal is to create a beautiful marbled effect, not to completely blend them. I once got a little too swirl-happy and ended up with a less-than-appealing grayish mix. Live and learn!
Step 6: Bake It!
Bake your bars in the preheated oven for about 30-35 minutes. The smell wafting through your kitchen at this point will be heavenly; trust me, it’s a real test of patience. Use a toothpick to check for doneness. If it comes out clean with just a few crumbs, you’re all set!
Step 7: Cool Down
Let your bars cool in the dish for at least 10 minutes before attempting to slice them. It’s tempting to dive right in—have some self-control! Allowing them to cool is key to ensuring they hold their shape when cut.
Tips for Best Results
Here are a few little tweaks that can elevate your baking game:
-
Use Fresh Carrots: Grating fresh carrots will provide the best texture and moisture. Use a box grater or food processor for speed!
-
Don’t Skip the Swirl: It adds a beautiful design to your bars, so go ahead; show it off!
-
Cool Completely: Let them cool down before cutting. This is a must. You’ll thank me when you see those perfectly crisp edges!
Ingredient Substitutions & Variations
Feeling adventurous? Here are some fun tweaks you can try:
-
Nut-Free: If you have nut allergies, this recipe is already safe, but keep an eye on if you’re using any mix-ins.
-
Gluten-Free Option: Substitute all-purpose flour for a gluten-free blend. Make sure to check the ratio for the best results!
-
Add-Ins: How about throwing in some raisins or chopped walnuts for texture? The more, the merrier.
-
Spices: Doesn’t cinnamon and nutmeg sound delightful? Feel free to play with different spices; ginger or allspice could give it a lovely twist!
Directions
- Preheat your oven to 350°F (175°C) and grease a 9×13 inch baking dish.
- In a bowl, mix grated carrots, granulated sugar, brown sugar, eggs, vegetable oil, and vanilla extract until well combined.
- In another bowl, whisk together flour, baking powder, baking soda, cinnamon, nutmeg, and salt. Gradually add the dry ingredients to the carrot mixture until just combined.
- In a separate bowl, beat cream cheese, powdered sugar, sour cream, and lemon juice until smooth.
- Pour half of the carrot cake batter into the prepared dish, then spread the cheesecake mixture on top, followed by the remaining carrot cake batter.
- Use a knife to swirl the two mixtures together gently.
- Bake for 30-35 minutes or until a toothpick comes out clean.
- Allow to cool before slicing into bars.
Pairing Ideas (Drinks, Sides, etc.)
Enjoy your Carrot Cake Cheesecake Bars with a scrumptious cup of coffee or a cozy tea. It’s a match made in heaven! For a more decadent treat, you could pair them with a scoop of vanilla ice cream on top, because why not? This perfect combination truly embodies what healthy comfort food should be!
How to Store and Reheat Leftovers
If you somehow find yourself with leftovers (which, let’s face it, is a solid ‘if’), store your bars in an airtight container in the refrigerator. They will keep well for up to a week. If you want to add that extra touch of warmth, simply pop a bar in the microwave for about 10-15 seconds. Just be cautious; nobody wants a molten dessert disaster!
Make-Ahead and Freezer Tips
You can also make these bars ahead of time! Bake them a day in advance, cool completely, and refrigerate. They taste even better the next day when the flavors have had time to meld. Thinking longer-term? Freeze them as well! Just slice them up, wrap each bar in plastic wrap, and then pop them in a freezer-safe bag. They should hold up in the freezer for about 2-3 months.
Common Mistakes to Avoid
-
Overmixing the Batter: This can lead to tough bars rather than soft, tender ones. Be gentle!
-
Not Measuring Ingredients Correctly: Precision is key! Sprinkling flour straight from the bag might make for a gooey mess. Always measure!
-
Skipping the Cooling Period: Cutting into warm bars can cause them to fall apart. It’s worth the wait, trust me!
Frequently Asked Questions (FAQ)
Can I use pre-grated carrots?
Absolutely! Just make sure they’re fresh for the best flavor.
Can I double the recipe?
Sure! Just bake it in a larger pan and adjust the baking time accordingly.
Can I substitute Greek yogurt for sour cream?
Yes! Greek yogurt can also add a lovely tang while keeping the consistency intact.
Is this recipe suitable for freezing?
Definitely! Just remember to wrap them well to prevent freezer burn.
How should I cut the bars for serving?
Use a sharp knife, and if you want clean edges, run the knife under hot water before making each cut.
Cooking Tools You’ll Need
- Mixing bowls (various sizes)
- Whisk
- Rubber spatula
- Grater or food processor
- Baking dish (9×13 inch)
- Electric mixer (optional but recommended for the cream cheese layer)
- Parchment paper (optional)
Final Thoughts
Making these Carrot Cake Cheesecake Bars is like inviting a little piece of comfort into your kitchen. Every bite is filled with love, nostalgia, and a splash of happy chaos. It’s a reminder that it’s okay to embrace imperfections in cooking—as well as in life. So gather your ingredients, roll up your sleeves, and dive into this delightful baking adventure.
If you enjoyed this recipe, don’t forget to save it on Pinterest or share it with a friend! Happy baking!