Easy Homemade Twinkies — Delicious Nostalgia
I always have a soft spot for budget-friendly recipes and easy weeknight dinners, but sometimes the oven demands something a little more indulgent — hello, homemade Twinkies. To be real, I didn’t set out to recreate a childhood icon; I was aiming for a light sponge cake to use up a carton of eggs and a lonely jar of vanilla. One thing led to another, and suddenly my kitchen smelled like a bakery from the past: warm, sweet sponge, butter melting at the edges, and that unmistakable marshmallow cream scent. Honestly, it felt like a hug in cake form.
The first time I attempted this, it was chaos. I overmixed the batter because I was multitasking — cooking dinner for quick family meals and answering texts — and the cakes came out dense. Oops. Round two? Fluffy clouds of cake with a golden skin that crackled faintly when I sliced them open. My niece declared them “better than the store”, and I’ll take that as validation. By round three, I’d perfected the filling and learned the difference a piping tip makes. Small victories, people.
There’s something unpatronizingly comforting about a homemade Twinkie. It’s nostalgic, but not clingy. It’s fancy enough to impress the cousin who thinks only bakeries can make good sponge, yet forgiving enough that a little crust or slightly uneven edges will still taste heavenly. The smells during baking — sweet vanilla, warm butter, a hint of caramelization — will pull family members from other rooms faster than you can say “dessert.” It’s a tiny theater of sensory joy: the crackle when you bite in, the airy crumb, the sweet creamy center. If you want to make something that’s both a treat and a conversation starter at the end of a chaotic week, this is it.
I’ll be honest: these aren’t exactly high protein meals or part of a keto meal plan. They’re a joyful, indulgent detour from meal prep. But they do fit into so many reader lives: as a weekend project, a birthday surprise, or a way to turn a standard lunchbox into something cheeky and fun. And because I like to tinker, I’ll show swaps for dairy-free, gluten-free, and even a lighter version that can slip into healthy comfort food territory. Spoiler: marshmallow creme still makes everything better.
Why You’ll Love This Recipe

- It’s a nostalgic showstopper that’s surprisingly simple to make at home.
- Makesfor a crowd-pleasing dessert ideal for quick family meals and bake sale wins.
- Customizable: dairy-free, gluten-free, or extra decadent depending on your mood.
- Leftovers (if there are any) freeze and reheat well — great for meal prep microwave lunches when you want a treat.
- Few ingredients, big payoff: a soft, sponge-y cake with a fluffy, sweet filling — like a handheld celebration.
- It’s forgiving. I burned one batch, salvaged another, and still had a room full of people fighting over the last one. It feels like a hug in a wrapper.
What Makes This Recipe Special?
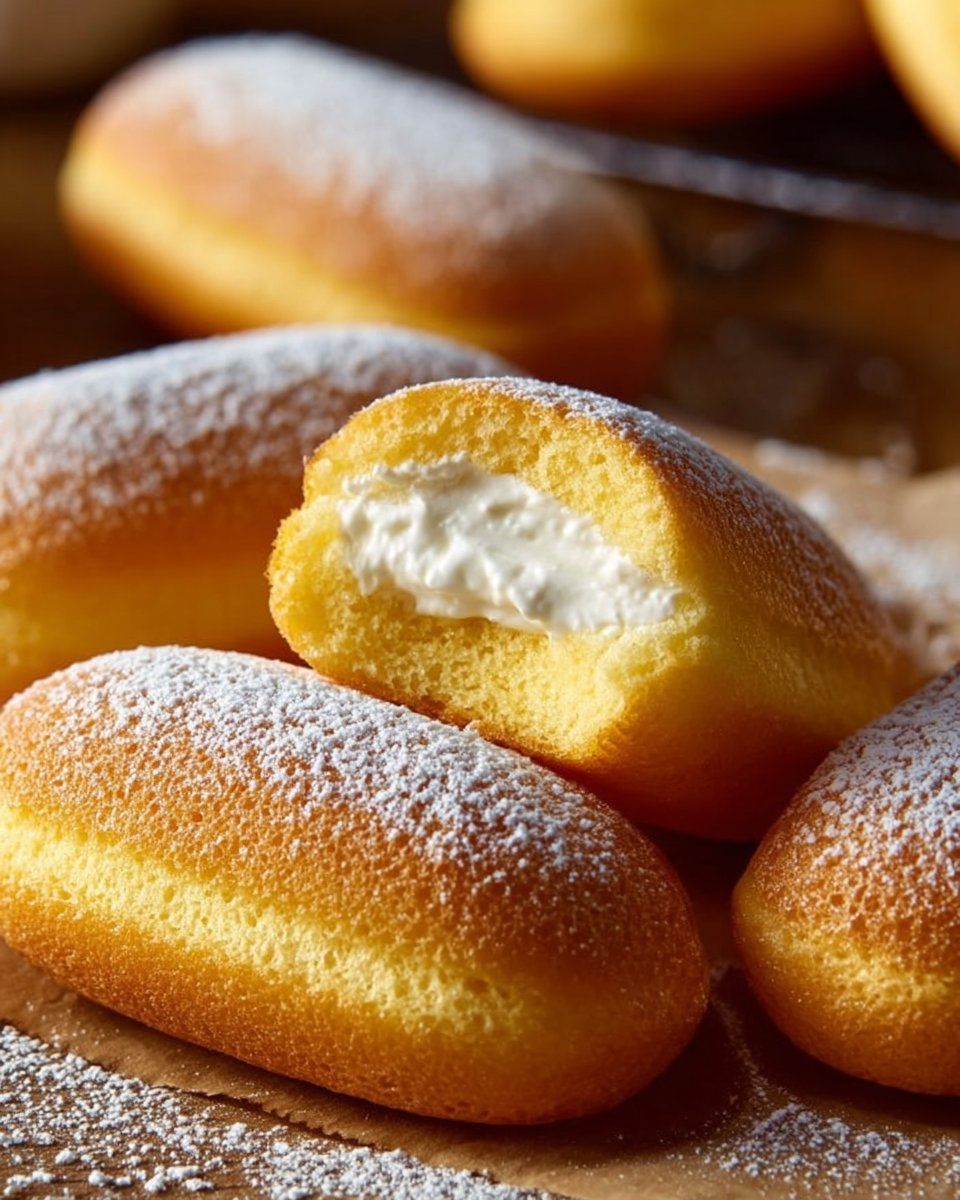
This recipe strips Twinkies down to their happiest parts: a light, tender sponge and a cloud-like filling. The trick is in the eggs and the method. Beating the eggs and sugar just right gives the batter its lift without relying on heavy machinery or weird additives. Also — and this is key — piping the batter into tubular molds (or a lined muffin tin if you’re improvising) preserves that vintage rounded shape and helps create that thin crisp exterior with a pillowy interior.
Another small-batch magic trick: the filling. Using store-bought marshmallow creme plus powdered sugar and cream gives a filling that tastes authentically nostalgic but with the control of homemade texture. You can make it thicker, silkier, or tangier depending on the ratio, and that flexibility keeps things interesting.
Finally, this recipe invites improvisation. Feeling adventurous? Drop a smear of jam inside for a strawberry Twinkie. Want to lean into healthy comfort food vibes? Use lighter cream and reduce sugar slightly. The soul of the Twinkie is there; the rest is up to you.
Ingredients
I love this ingredient list because it reads like a pantry raid. No weird preservatives, just familiar items that somehow transform into something magical.
- 1 cup All-purpose flour — the base. Can swap with a 1:1 gluten-free flour for a gluten-free version. Don’t use self-rising (it’ll throw off the ratio).
- 1 tbsp Baking powder — make sure it’s fresh. Old baking powder equals flat sadness.
- 1/2 tsp Salt — tiny but mighty for flavor balance.
- 3 large Eggs, room temperature — these are the heroes. Room temp eggs whip better and trap more air, which equals fluff.
- 1 cup Granulated sugar — white sugar produces a classic crumb and golden color. Coconut sugar works for a richer, caramel note.
- 1 tsp Vanilla extract — I sometimes sub a drop of almond extract for a nostalgic twist. Don’t go overboard; almond extract is potent.
- 1/2 cup Milk — any milk works. I’ve used whole, 2%, and almond milk with success. For a dairy-free Twinkie, use unsweetened soy or oat milk.
- 1/2 cup Unsalted butter, melted — gives richness and that golden hue. Swap coconut oil for dairy-free versions; the taste will be noticeably tropical but still wonderful.
- 1 cup Marshmallow creme — store-bought marshmallow fluff is my shortcut. Homemade marshmallow creme is divine if you have the time.
- 2 cups Powdered sugar — for thickening and smoothing the filling. Sift to avoid lumps.
- 1/2 cup Heavy cream — stabilizes the filling and makes it silky. Use canned coconut cream or a non-dairy cream substitute for dairy-free fillings.
Why each ingredient matters: Flour and baking powder build structure. Eggs provide lift and tenderness. Sugar sweetens and helps the crust form. Butter and milk add fat and moisture. Marshmallow creme is the nostalgic soul. Powdered sugar and cream give the filling body.
Don’t do this: don’t skimp on beating the eggs and sugar. That step is non-optional. Also, don’t overbake. The cakes should be pale gold with a slight spring. Overbaked sponge becomes dry, and no one wants dry Twinkies. And please, if you’re using coconut oil, remember it solidifies when cool — let filled cakes come to room temp before serving so the texture is right.
How to Make It Step-by-Step
This is the heart of it. I’m going to be chatty here because these moments — the smells, the tiny mistakes, the little wins — are everything.
Preheat and prep. Preheat the oven to 350°F. If you have Twinkie pans, bless you. I don’t, so I line a half-sheet pan with parchment and pipe into 4×2-inch logs. If you’re improvising, a mini loaf or even a muffin tin works — they just won’t be the classic shape. Grease lightly.
Sift the dry stuff. In a bowl, sift 1 cup of all-purpose flour, 1 tablespoon of baking powder, and 1/2 teaspoon salt. This keeps lumps away and helps the batter stay airy. I once skipped sifting during a rushed weeknight and got a small flour mountain on top of my batter. Not my finest hour.
Whip the eggs and sugar. In a large bowl, I whisk 3 room-temperature eggs with 1 cup granulated sugar and 1 teaspoon vanilla extract over a double boiler until warm to the touch — about 120°F if you’re being precise. This small heat step dissolves sugar and helps create a stable foam. Then, beat on high until pale and tripled in volume. It should fall back slowly, like thick ribbon. This is the critical, glorious stage. Honestly, it’s the difference between chewy cake and heavenly sponge.
Fold gently. Add a third of the dry mix to the egg foam and fold with a spatula. Gentle is the keyword here. Add the milk and melted butter next, folding in a few strokes, then the remaining dry ingredients. The batter should be light, moussy, and airy. Stop when just combined. I once stirred too vigorously and watched my batter deflate like a sad soufflé. Don’t be like me.
Pipe with purpose. Transfer batter to a piping bag fitted with a large round tip. Pipe into 4-inch log shapes about two-thirds full. Leave room to rise. If using a muffin tin, pipe them in equally. Sprinkle a few extra crumbs of sugar on top if you like a tiny crust. I sometimes make imperfect shapes on purpose because artisan chaos is my brand.
Bake and scent the kitchen. Bake 10–12 minutes until pale gold and springy. The kitchen will smell like cake and butter, and you’ll want to eat three before they cool. Resist. Let them cool on a wire rack for 10 minutes, then gently remove parchment and let them finish cooling.
Make the filling. Dump 1 cup marshmallow creme into a mixing bowl with 2 cups powdered sugar and 1/2 cup heavy cream. Beat on medium-high until it’s glossy and stiff enough to hold shape but still pipeable. If it’s too thick, a tablespoon of cream loosens it; if too thin, add powdered sugar. Taste. Yes, I taste the filling multiple times. Sue me.
Fill the cakes. Using a small round piping tip, insert the tip into the side of each cooled cake and pipe about 2 tablespoons of filling. Alternatively, slice cakes lengthwise and spoon filling in — rustic and charming. My preference is injecting the filling; it gives the correct vintage mouthfeel. I once overfilled a cake and had a glorious cream explosion — my T-shirt gained five stars that day.
Chill slightly or serve immediately. While a quick chill helps the filling set, these are lovely at room temperature. For parties, I prep the cakes, chill, and transport in a tight container. They keep their shape better that way.
Throughout these steps, keep an eye on textures: batter should be airy, cake should be springy, filling glossy and thick. If anything feels off, adjust. Baking is forgiving, if you listen.
Tips for Best Results
- Use room-temperature eggs for maximum rise. Cold eggs make flatter cakes.
- Don’t skimp on whipping. The egg-sugar foam is your lift — beat until thick and ribboning.
- Fold gently. Overmixing deflates air. Use a light hand.
- Fresh baking powder matters. Aged leavening gives flat, sad cakes.
- Pipe evenly for uniform bake times. If sizes vary, smaller pieces will overbake.
- Cool completely before injecting filling to avoid meltdown. I learned this after a marshmallow creek ran down my countertop. It was sticky, historical, and laughable.
- For shine on the filling, beat at high speed at the end for a minute to make it glossy.
Ingredient Substitutions & Variations
- Gluten-free: use a 1:1 gluten-free flour blend. Texture will be slightly different but still delicious. I’ve made these with a cup-for-cup blend and people didn’t know the difference.
- Dairy-free: sub coconut oil for butter and coconut cream for heavy cream. Use non-dairy milk. The flavor leans tropical but still delightful.
- Less sweet: reduce powdered sugar in filling by 1/4 cup and add a pinch of salt. It’ll be less cloying.
- Jam or citrus twist: fold a tablespoon of raspberry jam into the filling for a tart surprise. Add a teaspoon of lemon zest for a bright lemon Twinkie.
- Chocolate-coated: dip the cooled, filled cakes in melted dark chocolate for a retro chocolate shell. It’s showy and addictive.
- Mini versions: pipe smaller logs for bite-sized treats — perfect for lunchboxes or prepared meals for two dessert plates.
Directions
This is the short, actionable version: preheat oven to 350°F. Whisk and heat eggs + sugar, then beat until fluffy. Sift and fold in dry ingredients with milk and melted butter. Pipe into molds and bake 10–12 minutes. Cool, then fill with marshmallow-based cream and chill briefly. Serve with coffee or cold milk.
Best pairings? A strong espresso, a frothy iced latte, or a lightweight vanilla cream soda. Serve with sliced fruit for balance, or alongside a simple scoop of vanilla ice cream for an extra indulgent treat. This and a rom-com is perfection.
Pairing Ideas (Drinks, Sides, etc.)
Pair a Twinkie with something that cuts the sugar or complements the texture. Coffee is the classic. A bright, medium roast espresso complements the sweetness and cleanses the palate between bites. For kids or a retro vibe, cold milk or a vanilla cream soda is pure joy. If you want to elevate things: serve with a small pot of Earl Grey tea — the bergamot lifts the vanilla notes beautifully.
Sides: fresh berries, a citrus salad, or a small scoop of plain yogurt with honey balances richness and refreshes the palate.
For brunch: plate with scrambled eggs and crispy fruit salad for a nostalgic, imbalance-accepting spread. It’s weirdly satisfying.
How to Store and Reheat Leftovers
Store in an airtight container at room temperature for up to 2 days. If your environment is warm, refrigerate to keep the filling stable. Chilled Twinkies firm up and taste different; let them come to room temperature for a few minutes before serving.
Freezing works well. Place on a tray to flash-freeze, then transfer to a sealed bag for up to 2 months. Thaw in the fridge overnight, then bring to room temp to soften the filling. Reheating in a microwave for 10–15 seconds softens the cake and makes the filling pillowy again — but watch it. I nuked one for 30 seconds and the filling became lava. Lesson learned.
Make-Ahead and Freezer Tips
You can bake the sponge cakes up to 24 hours ahead and fill on the day of serving for optimal texture. If freezing, fill later to prevent sogginess. I sometimes freeze the unfrosted cakes and the filling separately; this gives me maximum control and fewer mid-party emergencies.
To transport: stack carefully in a shallow container with parchment paper between layers. Trust me: the last thing you want is a filling-fueled pastry traffic jam in the car.
Common Mistakes to Avoid
- Under-beating the eggs and sugar: leads to dense, sad cakes.
- Overmixing once the flour is added: deflates air and ruins texture.
- Filling while cakes are still warm: the filling will melt and leak. Big mess. Very sticky countertops.
- Using old baking powder: no lift, no joy.
- Overfilling: you’ll get cream oozing out the sides and possibly on your shirt. Cute, but risky.
Frequently Asked Questions (FAQ)
Q: Can I make these gluten-free?
A: Yes. Use a reliable 1:1 gluten-free flour blend. Texture may be slightly denser but still delicious.
Q: Can I use marshmallow fluff or homemade marshmallow creme?
A: Absolutely. Both work. Homemade gives a fresher flavor but takes more time.
Q: How long do Twinkies last?
A: At room temp, 1–2 days in an airtight container. Refrigerate in warm climates. Freeze up to 2 months.
Q: Can I make mini Twinkies?
A: Yes, pipe smaller logs and reduce bake time by 2–3 minutes. Watch closely.
Q: Are these suitable for meal prep?
A: They’re more of a treat than a meal prep staple, but they freeze and reheat well as a dessert component to prepared meals for two or special lunchbox surprises.
Cooking Tools You’ll Need
- Mixing bowls (at least two)
- Electric mixer or stand mixer (helps but whisking by hand works if you have upper body spirit)
- Piping bags and tips (large round tip for batter, small tip for filling)
- Twinkie pans or a baking sheet lined with parchment for improvised logs
- Sifter for powdered sugar and dry ingredients
- Wire rack for cooling
- Spatula for folding
- Small funnel or round tip for injecting filling
Final Thoughts
Making homemade Twinkies is one of those joyful, slightly rebellious kitchen projects. It’s not haute cuisine, but it is a delightful middle finger to mass-produced nostalgia — handcrafted, customizable, and unbelievably satisfying. Each batch tells a tiny story: the first time you see the batter rise, the laugh when the filling escapes, the pride when you slice one open and reveal that soft, fluffy interior. It’s about memories and flavors and the little domestic triumphs that make life sweeter.
If you try this, don’t worry about perfection. Bake imperfectly. Laugh at the sticky mistakes. Share them with people who will appreciate the whimsy. And yes, take photos. Post them. Tag me in your triumphs and disasters — I want to see that cream explosion.
If you enjoyed this recipe, don’t forget to save it on Pinterest or share it with a friend!
Conclusion
For more inspiration or alternative takes on homemade Twinkies, check out this classic version at Homemade Twinkies Recipe – ZoëBakes for step-by-step photos and tips. If you’re exploring allergy-friendly versions, this guide offers a clever twist: Homemade Copycat Gluten-Free Vegan Hostess Twinkies. My messy attempts and other reader-tested techniques are inspired by community favorites like Homemade Twinkies – My Messy Kitchen, and for a retro spin with different shapes and presentations, see Retro Twinkie Snack Cakes – Sweet Baked Life.
Homemade Twinkies
Ingredients
For the Sponge Cake
- 1 cup All-purpose flour Can swap with a 1:1 gluten-free flour.
- 1 tbsp Baking powder Ensure it's fresh.
- 1/2 tsp Salt Balances flavor.
- 3 large Eggs, room temperature These whip better and trap more air.
- 1 cup Granulated sugar For a classic crumb and golden color.
- 1 tsp Vanilla extract Almond extract can be substituted.
- 1/2 cup Milk Any milk works; use unsweetened soy or oat milk for dairy-free.
- 1/2 cup Unsalted butter, melted Substitute coconut oil for dairy-free.
For the Filling
- 1 cup Marshmallow creme Store-bought works as a shortcut.
- 2 cups Powdered sugar Sift to avoid lumps.
- 1/2 cup Heavy cream Can use non-dairy cream substitute.
Instructions
Preparation
- Preheat the oven to 350°F. Line a half-sheet pan with parchment paper or use muffin tins.
- Sift together the flour, baking powder, and salt in a bowl.
- In a large bowl, whisk the eggs, sugar, and vanilla over a double boiler until warm. Beat on high until pale and tripled in volume.
- Fold in a third of the dry mixture, then add the milk and melted butter, followed by the remaining dry ingredients until just combined.
Baking
- Transfer batter to a piping bag and pipe into molds, filling about two-thirds full.
- Bake for 10-12 minutes until pale gold and springy. Cool on a wire rack for 10 minutes.
Filling
- Beat together marshmallow creme, powdered sugar, and heavy cream until glossy and stiff.
- Insert a piping tip into the side of each cooled cake and pipe about 2 tablespoons of filling.
- Chill slightly or serve immediately.