Easy White Chocolate Peppermint Cookies: Your New Favorite Recipe
Let me tell you, there’s something magical about the holiday season. The air is crisp, and the world seems to wrap itself in twinkling lights and delicious smells. It’s a time when cozy evenings can be spent watching your favorite rom-coms while a batch of cookies bakes in the oven. That blissful aroma of vanilla and peppermint wafting through the house is like a warm hug for the soul. And let’s not forget those cookie cravings that hit suddenly, often with a side of nostalgia.
One recipe that has firmly found its place in my heart (and on my kitchen counter) is the White Chocolate Peppermint Cookies. I first whipped these up during a chaotic December, trying to impress my family with my baking skills. Spoiler alert: many things went sideways, but these heavenly cookies turned out to be my saving grace. Honestly, they felt like a triumph when everything else seemed to be a baking disaster.
I vividly remember that night — tangled in Christmas lights, and with flour dusting my kitchen (and somehow my hair), I somehow managed to create a symphony of flavors that made that chaotic evening worth it. As the cookies baked, the scents of gooey white chocolate mingled with cool peppermint filled the room. It was then that I craved the spirit of the holidays, but with a twist of sweet comfort. Each bite melted in my mouth, and I realized that life’s little victories come in the form of cookies.
Why You’ll Love This Recipe
-
Total Ease: These cookies come together in a snap. Perfect for when you realize your Christmas party is tomorrow and you need something that doesn’t scream “panic baking!”
-
Irresistibly Delicious: The creamy white chocolate paired with a refreshing peppermint crunch creates a combo that will make you feel like you’re indulging without the guilt – well, maybe not too much guilt!
-
All-Age Approval: Kids and adults alike go crazy for these cookies. Seriously, you’ll find Grandma sneaking a cookie while the kids are distracted – it’s that good!
-
Great for Making Ahead: Want cookies on a rainy day? Prepare the dough in advance, freeze it, and you’re set. Just think of all those quick family meals you could enjoy alongside fresh cookies. Cozy nights are calling!
-
Perfect You-Time Snack: Picture it: a cookie in hand, a little bit of milk, and your favorite book or Netflix show. It’s the ultimate comfort food moment.
-
Decorative Fun: Sprinkle these beauties with a bit more crushed peppermint for that Instagram-worthy look, or even dip the edges in chocolate for an added layer of indulgence.
What Makes This Recipe Special?
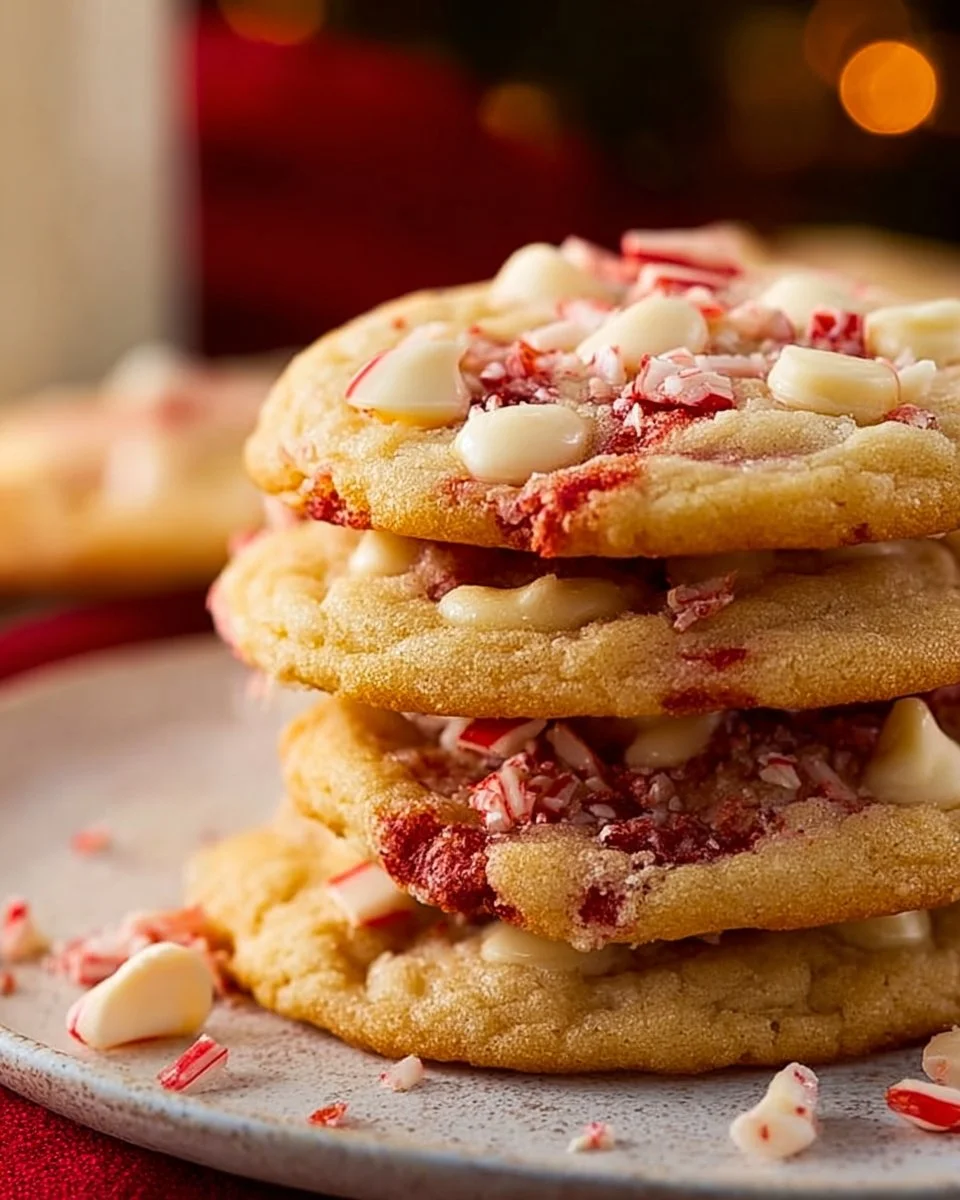
These White Chocolate Peppermint Cookies are anything but ordinary. We’ve got chewy, buttery goodness complemented by bursts of crunchy peppermint and sweet, melty white chocolate chips. You won’t find this combo in just any cookie.
The trick? It’s all in the method and the balance of flavors. First, you’ll cream that butter and sugar until it’s nice and fluffy, letting in all that delightful air. This gives our cookies their delicious texture. You’re also invited to get a bit more creative here. Next, don’t be shy with the peppermint! It’s the star of the show, and that refreshment cuts through the sweetness beautifully.
From my experience, these cookies also kick the holiday spirit into gear. There is something so uniquely comforting about the combination of peppermint and chocolate, reminiscent of cozy nights spent with family by the fireplace. So, whether you’re celebrating or simply embracing the end-of-year festivities, these cookies are a sweet staple for your collection.
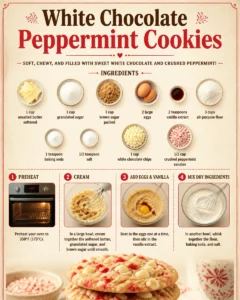
Ingredients
-
1 cup unsalted butter, softened: Trust me on this – room temperature, soft butter sets the stage for a rich, creamy dough that incorporates air beautifully!
-
1 cup granulated sugar: Adds the right amount of sweetness to balance the rich flavors.
-
1 cup brown sugar, packed: The molasses in brown sugar brings a lovely depth of flavor and moisture, keeping the cookies chewy.
-
2 large eggs: Binding agents and moisture – you’ll need these for that perfect texture.
-
2 teaspoons vanilla extract: Because every cookie needs a hint of vanilla magic!
-
3 cups all-purpose flour: This is your structural base. Don’t skimp – measuring properly is crucial!
-
1 teaspoon baking soda: The leavening agent adds just the right lift to our cookies.
-
1/2 teaspoon salt: A little pinch of salt enhances all the sweet flavors and balances the cookie perfectly.
-
1 cup white chocolate chips: Because we’re getting fancy here! They add gooey, melty yumminess.
-
1/2 cup crushed peppermint candies: The pièce de résistance! This is what makes your taste buds dance with delight during the holidays.
Now, a little tip from my kitchen chaos: don’t skip the crushed peppermint candies, and don’t just pop them in without crushing! I made that mistake once, and biting into a solid candy piece was not what I had in mind for my ‘melty’ cookie experience!
How to Make It Step-by-Step
-
Preheat the Oven: First things first, preheat your oven to 350°F (175°C). The excitement begins!
-
Creaming Time: In a large bowl, beat together the softened butter, granulated sugar, and brown sugar until smooth. This should take about 2-3 minutes. You want it fluffy and pale! Feel free to channel your inner baking star here, but oops — I once went a little overboard and accidentally made butter salad. Don’t make that mistake!
-
Whisk in the Eggs and Vanilla: Beat in the eggs one at a time, followed by the vanilla extract. You want this mixture creamy and silky.
-
Prepare the Dry Ingredients: In another bowl, whisk together the flour, baking soda, and salt. It sounds fancy, but it’s just as simple as gently mixing these with a fork. Don’t pretend it’s hard; you’re capable of this!
-
Combine It All: Gradually add the dry mixture to the wet one. Mix just until combined; overmixing can make them tougher. Trust me, I’ve made some interesting hockey puck cookies before.
-
Fold in the Goodies: Now, for the fun part! Gently fold in the white chocolate chips and crushed peppermint candies. The bright flecks of peppermint against the creamy white chocolate is such a festive sight; if you could bottle up joy, this would be it!
-
Spoon It Out: Drop spoonfuls of dough onto ungreased baking sheets, spacing them about 2 inches apart. I recommend using a cookie scoop; it works wonders for uniformity and scooping out dough without the oops, I got it all over my fingers chaos.
-
Bake Away: Pop those baking sheets into the oven and bake for 10-12 minutes, or until the edges are lightly golden. Make sure they’re slightly underbaked; they will continue to cook as they cool, ensuring they stay chewy and melt-in-your-mouth divine.
-
Cooling Off: Allow the cookies to cool on the baking sheets for a few minutes before transferring them to wire racks to cool completely. The gentle waft of peppermint in your kitchen? Pure bliss. Just don’t look too closely; I always end up with flour on my cheek from the earlier chaos!

Tips for Best Results
-
Room Temperature Ingredients: Make sure your butter and eggs are at room temperature for the best texture. Cold ingredients, in my experience, lead to cookies that might feel like little rocks. You want fluffy, not boulder-like!
-
Don’t Overmix: This is my golden rule when it comes to cookies. Gently fold in your dry ingredients until just combined. Trust me, your cookies will thank you!
-
Chill the Dough (Optional): If you have time, chilling the dough for about 30 minutes can intensify the flavors and help the cookies hold their shape better. I’ve tried it, and it’s worth the wait!
-
Be Adventurous: Swapping out half the white chocolate for dark chocolate or even adding in nuts can elevate your cookie game, but these babies are pretty fabulous as they are, too!
Ingredient Substitutions & Variations
-
Substituting Chocolate: If you want to go a little more traditional, dark chocolate chips can replace white chocolate chips. The combination of chocolate with peppermint is pretty elegant!
-
Nut Lover?: Consider folding in chopped pecans or walnuts for a delightful crunch. The combo of chocolate, peppermint, and nuts is a delightful surprise!
-
Vegan Option: To make this recipe vegan, substitute the butter for coconut oil and use a flax egg (1 tablespoon flaxseed meal + 2.5 tablespoons water). They’ll be fluffy and fabulous!
-
Seasonal Swaps: Depending on the season, these cookies can also be adjusted to reflect fall vibes by using cinnamon or nutmeg in the dough for a warming twist.
Directions
- Preheat your oven to 350°F (175°C).
- In a large bowl, cream together the softened butter, granulated sugar, and brown sugar until smooth.
- Beat in the eggs one at a time, then stir in the vanilla extract.
- In another bowl, whisk together the flour, baking soda, and salt. Add this gradually to the wet ingredients until combined.
- Fold in the white chocolate chips and crushed peppermint candies.
- Drop spoonfuls of dough onto ungreased baking sheets.
- Bake for 10-12 minutes until edges are lightly golden.
- Allow to cool on baking sheets for a few minutes before transferring to wire racks.
Pairing Ideas (Drinks, Sides, etc.)
These cookies are so cozy that pairing them with a warm beverage brings a touch of bliss to your indulgence. Let’s talk about how to elevate your cookie experience:
-
Milk: Regular or chocolate, you can’t go wrong. These cookies just belong with milk, right?
-
Coffee or Hot Chocolate: Nothing is more comforting than sipping on a warm drink while a cookie melts in your mouth. They complement each other perfectly!
-
Ice Cream: Throw a scoop of vanilla or peppermint ice cream on top for a decadent dessert twist. Honestly, that’s what dreams are made of.
How to Store and Reheat Leftovers
To ensure your cookies stay soft and chewy, store them in an airtight container at room temperature. Trust me, I’ve tried various methods, and the container trick works best!
If you have any leftovers (who are we kidding?), you could throw them in the microwave for 10-15 seconds to enjoy the melty goodness all over again. Just watch them closely; the hot burst of microwaved cookie is no joke!
Make-Ahead and Freezer Tips
You can easily make the dough ahead of time and refrigerate it for up to 3 days. Just be sure to let it come back to room temperature before scooping. If you want to make long-term freezer cookies, scoop the dough into balls and flash freeze them on a baking sheet before transferring them into a freezer-friendly bag for up to 3 months.
When you’re ready to bake, just pull out what you need, let them thaw for a few minutes, and pop them in the oven. Fresh cookies, all at your fingertips? Yes, please!
Common Mistakes to Avoid
-
Not Measuring Flour Correctly: Too much flour can lead to dry cookies. Make sure to spoon it into your measuring cup and level it off. You don’t want dough that could double as a doorstop!
-
Overbaking: Keep a watchful eye, and always take them out when the edges are golden but the centers seem slightly underdone. They’ll perfect themselves outside the oven.
-
Overmixing the Dough: Mixing too much can result in tough cookies. Remember, you want them soft and chewy, not like little rocks!
Frequently Asked Questions (FAQ)
1. Can I use different types of chocolate?
Absolutely! You can swap out white chocolate for semi-sweet or dark chocolate for a different flavor profile. Just keep an eye on the sweetness balance!
2. How do I make them festive?
Top them with more crushed peppermint or even drizzle some melted chocolate on top when they’re cooled. Holiday sprinkles also do wonders!
3. How long do these cookies last?
When stored correctly in an airtight container, you’ll typically enjoy them for about a week. But let’s be real – they probably won’t last that long!
4. Can I make these gluten-free?
Definitely! You can substitute gluten-free flour 1:1, and you should be golden! Just watch out for any additional binding agents required in the flour you choose.
5. Can I freeze baked cookies?
Of course! They can be stored in an airtight container in the freezer for up to 3 months. Just pop them in the microwave or let them thaw at room temperature, and they’ll be just as delicious.
Cooking Tools You’ll Need
- Mixing bowls (a set is a game-changer!)
- Wooden spoon or stand mixer
- Measuring cups and spoons (don’t skip on these!)
- Baking sheets
- Parchment paper (optional, but recommended for easy cleanup)
- Cooling racks
Final Thoughts
Baking these White Chocolate Peppermint Cookies isn’t just about making a delicious treat; it’s about creating memories in the kitchen. They remind us that even in the chaos of life, we can find joy in the simplest of things. So if you’re looking for a way to bring warmth to your home this season (and a sweet treat for yourself), look no further.
I’d absolutely love to hear about your own experiences baking these cookies. Did you add a twist, or did something silly happen along the way? If you enjoyed this recipe, don’t forget to save it on Pinterest or share it with a friend. Happy baking!