Easy Delicious Chicken Katsu Bowl — High-Protein Dinner
The first time I made a chicken katsu bowl, my kitchen looked like a breadcrumb crime scene. Honestly, crumbs everywhere — on the floor, on the counter, in my hair. But the smell? Pure comfort: warm frying oil mingled with toasty panko and the sweet tang of tonkatsu sauce, and I was immediately hooked. To be real, this recipe earned its place in my weeknight rotation because it hits that rare sweet spot between easy weeknight dinners, healthy comfort food, and high protein meals — all without making me feel like I spent my whole evening cooking.
I remember doing a trial run before hosting friends and nearly burned the first batch because I wanted them extra golden. Oops. I learned the hard way that temperature matters. Later that night, everyone scraped their bowls clean, and I felt like a kitchen wizard — or at least a slightly less chaotic cook. Since then, this dish has been my go-to when I need a hug-in-a-bowl after a long day, a crowd-pleaser for picky eaters, or a simple meal that also fits into a meal planning chicken routine.
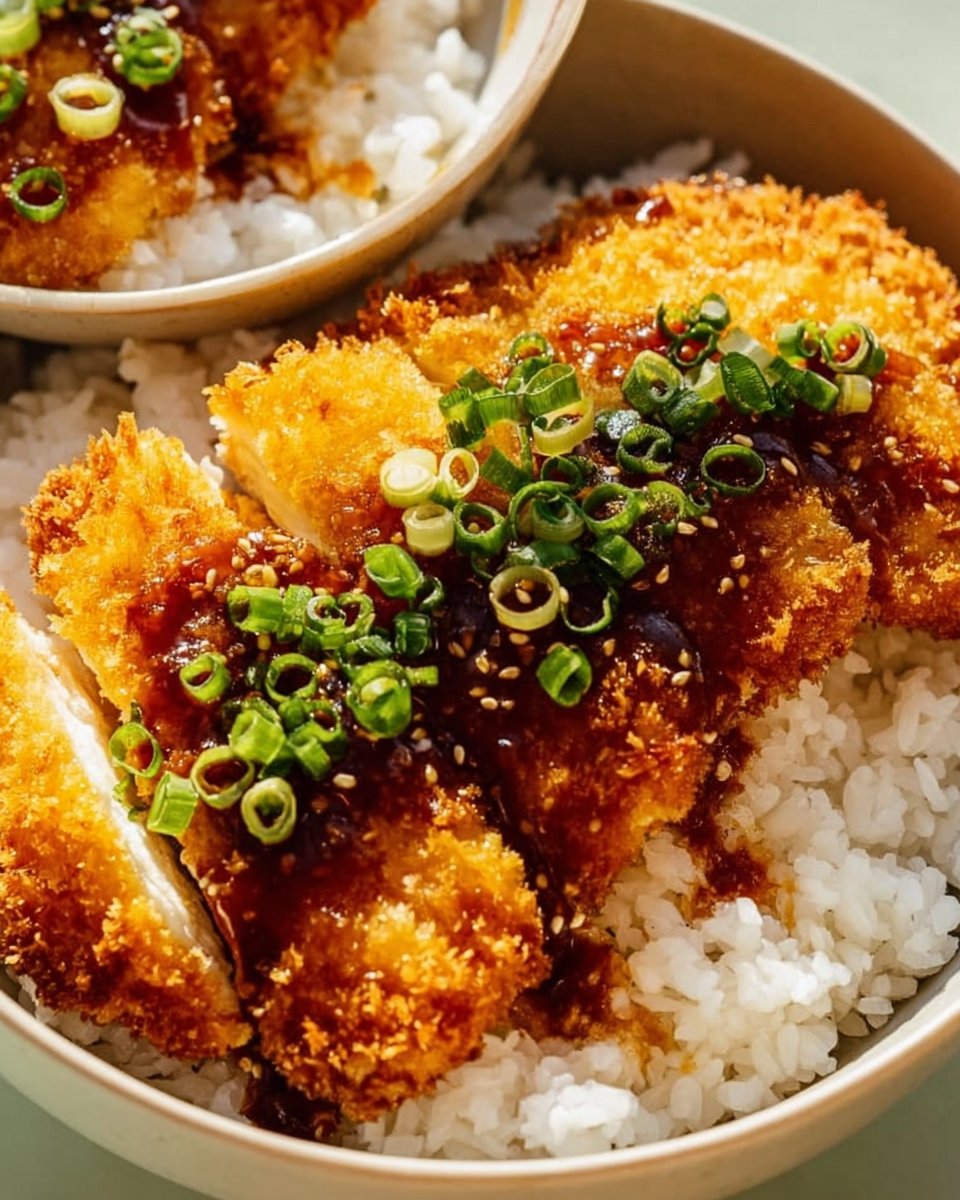
This version is purposefully simple: pounded chicken breasts, a crispy panko crust, a steamy bed of rice, shredded cabbage for crunch, a generous drizzle of tonkatsu sauce, and a final scatter of sesame seeds and green onions. It’s familiar but special — like your favorite jacket that somehow still surprises you on a rainy day.
I love that it’s both satisfying and adaptable. Want something for busy nights? It works for budget-friendly recipes and scales up for quick family meals. Trying to keep the macros in check? It’s easily tuned toward high protein high carb low fat meals by choosing lean chicken and controlling oil. And if you’re prepping for lunches, these bowls reheat beautifully without becoming sad and soggy — promise.
So tuck in your apron, accept the breadcrumbs, and let’s make something delicious and real — no perfection required, just good food and good vibes.
Why You’ll Love This Recipe

- It’s one of those easy weeknight dinners that looks restaurant-fancy but is actually incredibly approachable.
- Comforting textures: crunchy exterior, juicy chicken, fluffy rice, and crisp cabbage — every bite is satisfying.
- High on protein without being heavy — a lovely high protein meals entry for dinner or meal prep.
- Picky-eater approved: the familiar fried-crisp + sweet-savory sauce combo wins across ages.
- Budget-friendly and scalable for families, leftovers, or a date-night-in.
- Versatile — swap rice for greens for a lower-carb twist or double up for meal-prep magic.
What Makes This Recipe Special?
There’s a simplicity to katsu that doesn’t try to be fancy — it thrives on technique. The trick is even thickness of the chicken so it cooks evenly, and the panko — lighter and flakier than regular breadcrumbs — gives that airy crunch I can’t resist. The tonkatsu sauce is the emotional crescendo: it’s sweet, tangy, and a little smoky. Combine that with a bed of steaming rice and shredded cabbage and you’ve got a bowl that feels like a warm, crunchy hug.
I’ll shout-out the tiny details: pressing panko onto the wet chicken instead of just shaking it in gives a more durable crust; resting the fried cutlets briefly keeps them juicier; and throwing a handful of sesame seeds and sliced green onions on top makes it look and taste like you actually know what you’re doing. My favorite part? The moments when people pause mid-bite, eyes close, and whisper, “This is so good.” That’s the whole point.
Ingredients
- Chicken breasts — I use boneless, skinless breasts and pound them to an even thickness. Lean and classic.
- Panko bread crumbs — the star for that signature crunch. I buy the Japanese-style panko for flakiness.
- All-purpose flour — for the first dredge to help the egg stick.
- Eggs — beaten, they act as the glue between flour and panko.
- Salt and pepper — simple seasoning, but don’t skimp.
- Tonkatsu sauce — the soul of the bowl. Ready-made bottles are fine; there are great options at Asian markets or the grocery aisle.
- Rice — short-grain white rice is traditional, but jasmine or brown rice works too.
- Shredded cabbage — adds fresh crunch and cuts the richness.
- Sesame seeds — toasted if you can, for a nutty finish.
- Green onions — sliced thin for brightness.
Why each ingredient matters:
- Chicken breasts: They’re neutral and absorb flavors; pound them for even cooking. Tip: thicker parts cook slower and dry out, so don’t skip pounding.
- Panko: It’s lighter than regular crumbs and gives that airy crunch. Don’t swap with standard breadcrumbs unless you want a denser crust.
- Flour/egg/panko trio: Classic triple-dredge technique — flour dries the surface, egg adds stickiness, panko gives texture. Trust it.
- Tonkatsu sauce: If you can find a brand labeled for tonkatsu, grab it. Otherwise, a mix of ketchup, Worcestershire, and soy sauce works in a pinch.
- Rice: It holds up to sauce and adds comforting carbs. For high protein high carb low fat meals, pair with lean protein like chicken.
- Shredded cabbage: I buy a pre-shredded bag when lazy, but I prefer fresh cabbage shredded thin for the best crunch — don’t wilt it with the hot chicken; keep it raw.
Brand notes and substitutions:
- I like Kewpie Panko or any Japanese brand for the crispest texture.
- For tonkatsu, I’ve had great luck with Bull-Dog brand, but a homemade shortcut is fine.
- If you’re watching calories, use an oil with a high smoke point and a light hand — or oven-bake the cutlets (details below).
- Don’t do this: salt the chicken after breading. It draws moisture and makes the crust soggy. Salt the meat before breading.
How to Make It Step-by-Step
I’ll talk you through this like I’m standing at the counter with you, elbow deep in flour and probably humming something off-key. I make this recipe about once a week now; some weeks I’m calm and coordinated, other weeks the breadcrumbs stage a full rebellion. Either way, it turns out delicious.
- Cook the rice first. I use the package instructions and let it steam while I prep the chicken. The smell of rice cooking is my unofficial “I can do this” soundtrack. Fluff it with a fork and keep it warm.
- Prep the chicken. Lay a breast between two pieces of plastic wrap and pound it gently with a meat mallet or heavy skillet until it’s an even thickness — about 1/2-inch is ideal. It makes the cooking time predictable and the texture tender. Season both sides with salt and pepper. This is a tiny act of love that pays off.
- Set up your breading station. Line up three shallow dishes: one with all-purpose flour, one with beaten eggs (I add a splash of milk sometimes), and one with panko. Don’t skimp on the panko — you want enough to press the chicken into so it gets a generous crust.
- Dredge the chicken. I dust each piece lightly in flour, tap off excess, dip into the egg to coat, and then press firmly into the panko. Don’t be shy about pressing — the panko sticks better when you really press it on. If your hands look like a breadcrumb monster at this point, you’re doing it right.
- Heat the oil. In a heavy skillet, heat about 1/4-inch to 1/2-inch of neutral oil (vegetable, canola, or grapeseed) over medium heat. The key is temperature: too hot and the crust burns before the chicken cooks; too cool and it soaks up oil. I test with a tiny scrap of panko — it should sizzle, but not immediately blacken.
- Fry patiently. Add the cutlets and fry for about 4–5 minutes per side until golden brown and cooked through. I keep the heat consistent and resist the urge to crowd the pan. When I first learned this, I crowded the pan and ended up steaming the chicken — the crust was limp and sad. Learn from my mistakes.
- Drain and rest. Transfer cutlets to a wire rack set over a sheet pan or paper towels for a minute to rest. Resting helps juices redistribute and keeps the crust crisp.
- Slice and build bowls. Slice the cutlets into strips and arrange over a bowl of rice. Drizzle generously with tonkatsu sauce. Add a mound of shredded cabbage on the side, then sprinkle sesame seeds and green onions on top. If you’re feeling fancy, a few dots of Japanese mayo or a squeeze of lemon is lovely.
- Eat right away. The contrast between hot chicken and cool cabbage is part of the charm. I like to spoon rice and sauce into each bite so nothing tastes lonely.
Senses and textures:
- Sound: the satisfying sizzle when panko hits warm oil.
- Smell: toasty panko and a faint sweet tang from the sauce.
- Texture: the first bite should be crisp; the inside juicy; the cabbage crunchy.
- Taste: sweet, tangy, umami-rich sauce playing against savory breaded chicken.
My oops moments and lessons:
- Too-cool oil = greasy crust. Don’t rush heating.
- Crowding pan = soggy crust. Fry in batches.
- Skipping the flour step = panko falls off. Flour matters.
- Salting after breading = soggy crumb. Season early.
Encourage improvisation:
- Toss in a fried egg or quick-pickled cucumbers.
- Swap rice for quinoa for a slightly nuttier bite.
- Try a drizzle of sriracha mayo if you like heat.
Tips for Best Results
- Keep your oil temperature steady. Use a thermometer if you have one — 350–375°F is a sweet range for frying.
- Press the panko on firmly. The extra contact ensures the crust sticks and stays when you slice.
- Use a wire rack to drain, not just paper towels — it keeps the crust crisp.
- Don’t overcrowd the pan; frying in batches is worth the extra time.
- Let the chicken rest a couple minutes after frying; instant slicing causes juices to run out.
- For a lighter version, bake at 425°F for 15–20 minutes, flipping once, brushing lightly with oil.
Ingredient Substitutions & Variations
- Chicken to turkey: Ground turkey cutlets or thin turkey breasts work fine if you want a slightly different flavor but keep the lean protein.
- Panko to crushed cornflakes: If you’re out of panko, crushed cornflakes make a surprisingly crunchy substitute.
- Tonkatsu sauce swaps: In a pinch, mix ketchup + Worcestershire + a splash of soy + a little brown sugar. It won’t be exact, but it’ll be close.
- Lower-carb: Serve over mixed greens or cauliflower rice for a low calorie chicken meal prep option.
- Oven-baked: For less oil, oven-bake panko-coated breasts on a greased rack at 425°F, flipping halfway through.
- Add spice: Mix a little cayenne or shichimi togarashi into the panko for heat.
- Vegetarian spin: Use thick slices of eggplant or firm tofu, press, bread, and fry similarly for a plant-forward bowl.
Directions
Cook the rice according to package instructions. Pound the chicken breasts to an even thickness and season with salt and pepper. Set up a breading station with flour, beaten eggs, and panko bread crumbs. Dredge each chicken breast in flour, dip in eggs, and coat with panko. Heat oil in a skillet over medium heat and fry the chicken until golden and cooked through, about 4–5 minutes per side. Slice the chicken and serve over cooked rice. Drizzle with tonkatsu sauce and garnish with shredded cabbage, sesame seeds, and green onions. Enjoy your comforting Japanese Katsu Bowl — try to resist finishing the entire bowl in one sitting, but no promises.
Pairing Ideas (Drinks, Sides, etc.)
- Drinks: I love a cold green tea or an ice-cold lager. For a non-alcoholic option, sparkling yuzu soda is bright and refreshing.
- Sides: Quick miso soup, edamame sprinkled with sea salt, or pickled cucumber slices.
- Dessert: Something light — a bowl of sliced mango or a matcha panna cotta keeps the meal balanced.
- Cozy combo: This and a rom-com is perfection — salty, crunchy, warm, and immediately uplifting.
How to Store and Reheat Leftovers
Store components separately when possible. Keep rice at the bottom, sliced chicken in an airtight container, and cabbage in a separate container or bag. Leftover chicken crunch is best the same day, but it keeps well for 2–3 days refrigerated.
To reheat:
- Oven: Preheat to 350°F and reheat chicken on a wire rack for 8–10 minutes until warmed and crisped.
- Air fryer: 350°F for 4–6 minutes gets the crust back to life.
- Microwave: If you must, microwave rice and chicken briefly, then pop chicken under the broiler or in the air fryer for a minute to revive the crust. Microwaving alone makes the panko soggy — I learned this the sad way.
Avoid reheating in oil again; too much oil makes it greasy.
Make-Ahead and Freezer Tips
- Make breaded, uncooked cutlets and freeze them flat on a sheet pan until solid, then transfer to a bag. Fry from frozen, adding an extra minute or two per side.
- Cooked cutlets freeze okay but lose some crunch. Reheat from frozen in the oven at 375°F for 12–15 minutes.
- Rice freezes well in individual portions; thaw in the fridge or microwave briefly.
- Pre-shred cabbage and store in an airtight container with a paper towel to absorb moisture for up to 3 days.
Common Mistakes to Avoid
- Skipping the flour coat: panko won’t cling as well.
- Overcrowding the pan: leads to steaming not frying.
- Frying at too high a temperature: crust burns, interior undercooks.
- Salting after breading: crust becomes soggy and salty pockets form.
- Cutting too early: juices run out and meat dries.
Frequently Asked Questions (FAQ)
Q: Can I use boneless thighs instead of breasts?
A: Yes! Thighs are juicier and more forgiving; adjust cooking time slightly.
Q: Is tonkatsu sauce necessary?
A: It’s traditional and delicious, but you can use a mix of ketchup, Worcestershire, and soy in a pinch.
Q: Can I bake instead of fry?
A: Absolutely. Bake at 425°F on a rack for 15–20 minutes, flipping halfway. Brush lightly with oil for better browning.
Q: How do I keep the panko from falling off?
A: Press the panko firmly onto the egg-coated chicken and let the breaded cutlets rest a few minutes before frying so the coating sets.
Cooking Tools You’ll Need
- Meat mallet or heavy skillet for pounding
- Three shallow dishes for the breading station
- Heavy skillet (cast iron is great) or deep pan for frying
- Tongs or spatula for flipping
- Wire rack and sheet pan for draining
- Sharp knife for slicing
- Rice cooker or pot for rice
Final Thoughts
This chicken katsu bowl has become one of those dishes that shows up when life needs comfort with zero drama. It’s forgiving, crowd-pleasing, and somehow both humble and celebratory. I love the little rituals around it — the gentle thwack of chicken under the mallet, the tiny burst of oil when panko hits the pan, the satisfying look of sesame seeds sprinkled on top. Cooking it has taught me patience (heat your oil), humility (expect crumbs everywhere), and the joy of sharing food that makes people smile.
If you make it, don’t stress about perfection. Burn one batch, laugh it off, and learn. Fold in your favorite tweaks, make it your own, and let this bowl be a dependable hug on chaotic nights. If a recipe is supposed to bring people (and yourself) joy, then mission accomplished.
If you enjoyed this recipe, don’t forget to save it on Pinterest or share it with a friend!
Conclusion
For another take on crispy, saucy chicken bowls, check out this lovely recipe at Crispy Chicken Katsu Bowls — Half Baked Harvest for more inspiration.
If you want a homey, family-friendly version to compare techniques, this Chicken Katsu Rice Bowls — Eight Forest Lane post has great tips.
And for a slightly different protein perspective (not in this recipe but useful for ideas), see this Pork Tonkatsu Bowls — Seasons and Suppers.