Easy Chocolate Crinkle Cookies — Quick, Budget-Friendly Treats
The first time I made these Chocolate Crinkle Cookies, my kitchen looked like a snow globe exploded — powdered sugar everywhere, a guilty toddler with a cocoa-smeared grin, and me, holding a slightly cracked cookie like it was a tiny masterpiece. To be real, the recipe was supposed to be an easy dessert to rescue our chaotic weeknight dinner, a little sweet punctuation after easy weeknight dinners and quick family meals. Instead it became a full-blown kitchen memory that smelled like dark chocolate and nostalgia for days.
These cookies are the kind of thing that makes you late for bed because you “just need one more” fresh from the oven. Honestly, the first dozen I baked were flat as pancakes because I forgot to chill the dough — oops. Lesson learned: respect the chill time. After that misstep, they crinkled into shiny, crackled domes that looked like they’d been dusted by sugar angels.
Think of this as a comfort-baking ritual. The deep cocoa scent fills the house faster than any candle, and the slight crackle of powdered sugar as you bite into the pillowy center is happiness in sound. These cookies pair perfectly with leftovers from budget-friendly recipes or as the sweet finish to a meal planning chicken dinner. I’ve also packed them in boxes for neighbors, snuck them into lunch containers for ready made protein meals aficionados (they’re not protein bars, but they do raise morale), and brought them to potlucks where they vanished faster than I could say “seconds.”
This recipe matters because it’s forgiving. It’s the kind of cookie that survives my scatterbrained moments — no special equipment, no temperamental technique, just good chocolate and a few pantry staples. It’s also cheap to make: think budget-friendly recipes that don’t taste cheap. And if you’re pairing them with a busy week of meal prep microwave lunches or searching for the perfect dessert to follow healthy comfort food, these crinkles slot right into the plan.
To sum up: messy is okay, flour on your jeans is a badge of honor, and a drawer full of cookie tins is a sign of a kitchen well-loved. This post will walk you through the why, the how, and the tiny hacks that turned my first “uh-oh” batch into a recipe I reach for time and time again.
Why You’ll Love This Recipe
- It’s ridiculously simple — perfect after easy weeknight dinners or when you need a sweet finish to quick family meals.
- Budget-friendly ingredients mean it plays well with budget-friendly recipes and doesn’t wipe out your grocery budget.
- Crowd-pleasing texture: crisp-ish edges, melt-in-the-middle centers — like healthy comfort food for your soul.
- Great for gift-giving and meal prep; they travel well with ready meals for 2 style portions (tiny containers, big smiles).
- No fancy equipment. No fuss. Just stir, chill, roll, bake. It fits into chaotic routines like meal prep microwave lunches and best meal prep plans.
- Comfort food that also doubles as a nostalgic hug — every bite is that warm, generous feeling.
What Makes This Recipe Special?
What sets these crinkle cookies apart is their glorious crackle. That powdered sugar skin against dark chocolate is a texture contrast I could write home about. The vegetable oil keeps the cookie soft and pliable even after cooling, so you don’t get that chalky dry crumb some cookies suffer from. Also, they’re forgiving: overmixing won’t ruin them, and chilling for half an hour is the only “big” step.
There’s also an emotional twist. I associate this recipe with rainy Saturday afternoons when my grandmother would let me lick the spoon — except in my case, the spoon was a wooden spatula and the cookie dough was slightly more adult because of the deep, almost bittersweet cocoa. It’s classic, nostalgic, and just a smidge modern because we use pantry staples and skip anything fussy. And honestly? They’re a great dessert after a day filled with high protein meals or as a small treat alongside low calorie premade meal delivery convenience days.
Ingredients
I like keeping ingredient lists short and true. Here’s what you’ll need and why each piece matters.
- 1 cup unsweetened cocoa powder — This is the chocolate backbone. Use a Dutch-processed cocoa for a rounder, smoother flavor, or natural cocoa for brighter chocolate notes.
- 2 cups granulated sugar — It gives structure and that glossy crinkle top when dusted with powdered sugar.
- 1/2 cup vegetable oil — Keeps cookies soft and tender. You can sub with mild olive oil if you like a slightly more savory edge, but don’t use extra-virgin — it’s too strong.
- 4 large eggs — Eggs bind, give lift, and make the interior tender. They also help the crackle appear as the cookie spreads.
- 2 teaspoons vanilla extract — Small but magical; don’t skip it. Use a good vanilla for the best finish.
- 2 cups all-purpose flour — The frame of the cookie. Spoon and level to avoid dense cookies.
- 2 teaspoons baking powder — Gives the lift that creates those beautiful domes.
- 1/2 teaspoon salt — Balances the chocolate and sweetness.
- 1 cup powdered sugar for coating — For that signature snowy look and slightly crunchy outer layer.
Trust me: don’t eyeball the flour. I once did and ended up with cookie hockey pucks. That was sad, pun intended. Use a tablespoon to level the flour or weigh if you have a scale. If you’re out of powdered sugar, blitz granulated sugar briefly in a blender — it works in a pinch but the texture won’t be as fine.
Substitutions I often use:
- Swap 1/4 cup of flour for almond flour for a nuttier interior. The texture changes a bit, but it’s delicious.
- Use coconut oil (solid) when I want a hint of coconut aroma; melt it and let it cool first.
- Add a tablespoon of espresso powder to the cocoa if you want chocolate flavor that sings.
Don’t do this: skip chilling the dough just because life is busy. I’ve done it. Flat cookies aren’t flattering, and regret tastes like overbaked chocolate.
How to Make It Step-by-Step
Preheat the oven and let’s get into the comforting rhythm. I prefer to measure everything out like mise en place because then my toddler-less brain can’t sabotage me mid-mix. I also blast an upbeat playlist because apparently cookies taste better with 90s pop in the background.
Step 1 — Mix the chocolate base: In a large bowl, whisk together the cocoa powder and granulated sugar until combined. Add the vegetable oil and stir. The mix looks dry at first, but keep going. The oil coats the cocoa and the mixture starts to feel sandy and glossy. The smell at this stage is deep, chocolatey, and slightly intoxicating. I often steal a finger swipe and regret it because it’s so rich.
Step 2 — Eggs and vanilla: Crack the eggs in one at a time, whisking thoroughly after each addition. The batter will loosen and become glossy, turning into a thick, brownie-like batter. Stir in the vanilla. This is where the batter stops looking like dry sand and starts behaving like cookie dough. If your arm gets tired, switch to a hand mixer — I have several times and it’s a life-saver.
Step 3 — Dry ingredients: In a separate bowl, whisk the flour, baking powder, and salt. Gradually add the dry ingredients to the wet, folding until just combined. The dough will be dense, but that’s intentional. Don’t overmix — you’ll want to avoid too much gluten development, which makes cookies tough.
Step 4 — Chill: Pop the dough into the fridge for about 30 minutes. This is non-negotiable. I once tried to skip it because my oven timer dinged and curiosity got the best of me. The result was sad and flat. Chilling firms the dough, helps with the crackled appearance, and gives the cookies their soft center. Use this time to clean up the powdered sugar mess on your countertop or to dance around the kitchen to justify the calories.
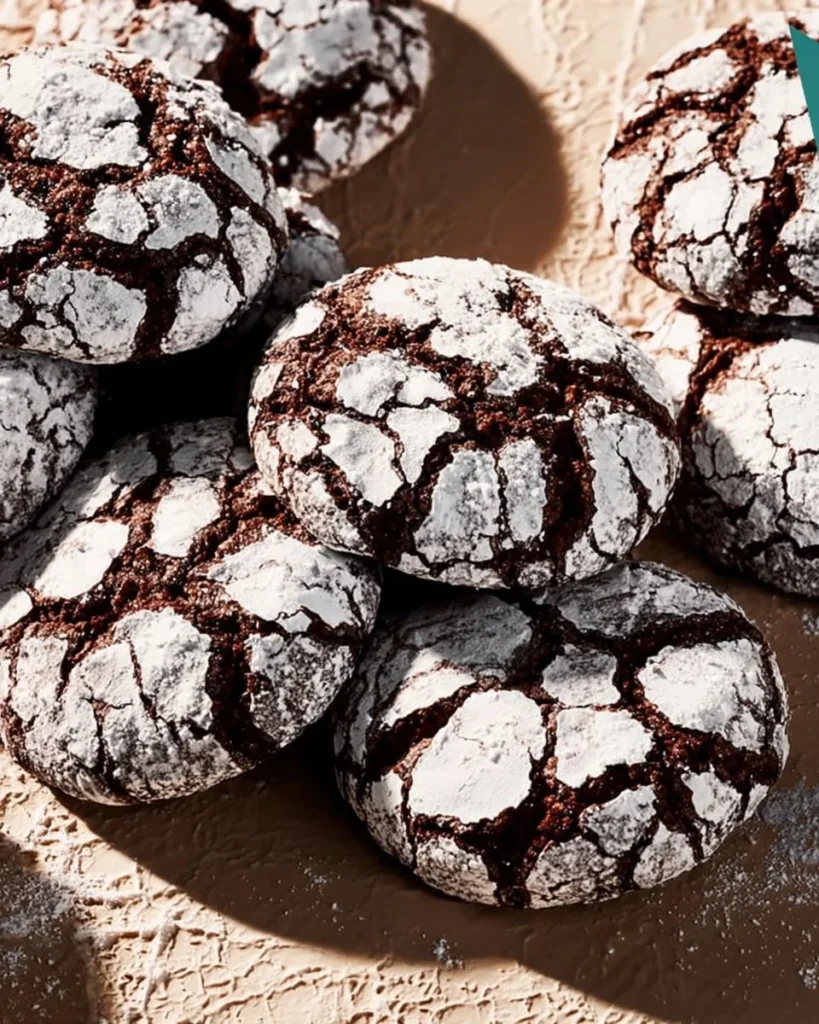
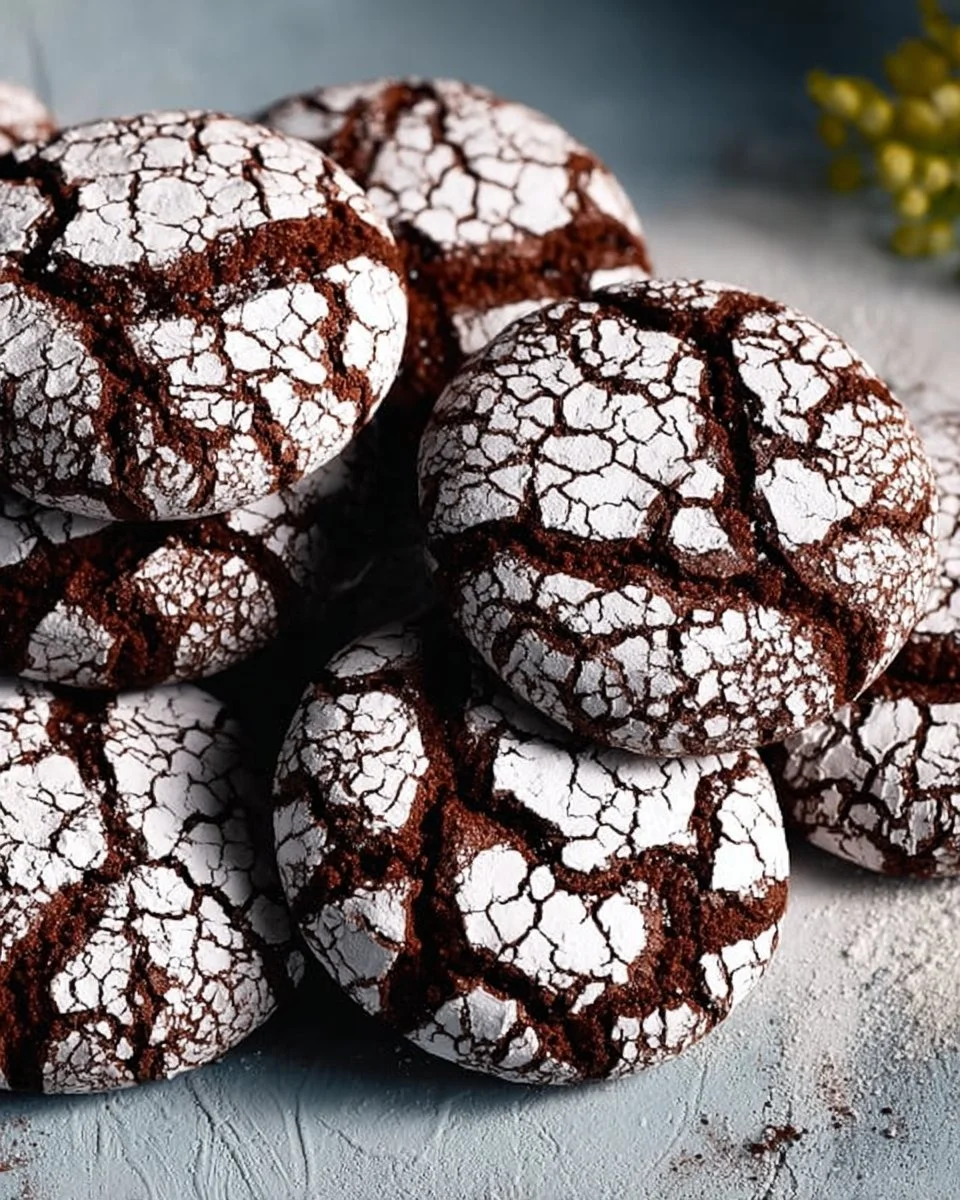
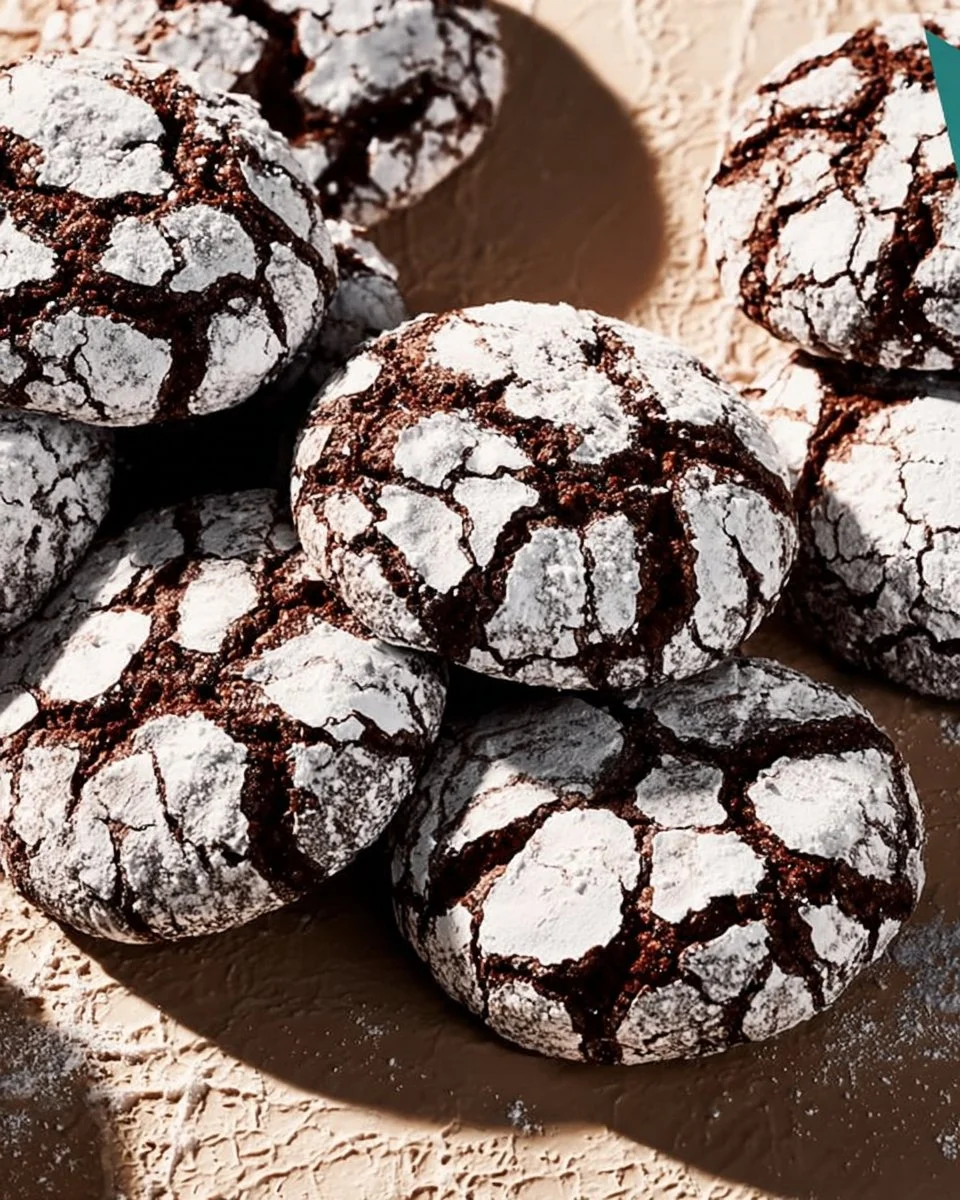
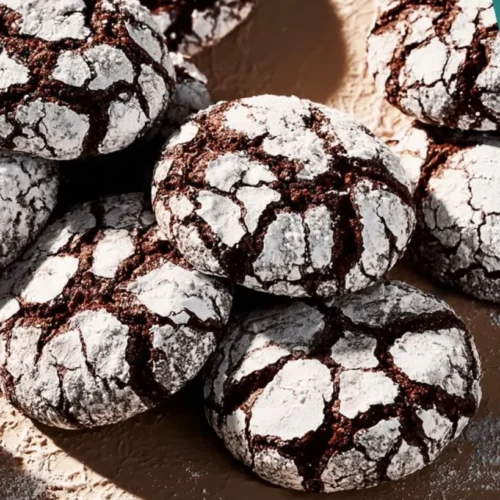
Step 5 — Scoop and roll: Use a tablespoon to scoop dough and roll it into balls about an inch in diameter. Roll each ball generously in powdered sugar until fully coated. The more sugar, the prettier the cracks. If it’s sticky, dampen your hands slightly or refrigerate the dough for a little longer — I’ve learned this on sticky-fingered afternoons.
Step 6 — Bake: Place cookies about 2 inches apart on a parchment-lined baking sheet. Bake at 350°F (175°C) for 10–12 minutes. The edges will set and the centers will still be slightly soft. The top will develop those snowcap cracks that make them so appealing. Don’t overbake — the centers should look a bit underdone; they continue to set as they cool.
Step 7 — Cool: Let the cookies cool on the baking sheet for a few minutes before transferring to a wire rack. This eases them into their final texture and helps avoid breakage. Then, taste. Smile. Perhaps hide them.
The first time I followed this sequence perfectly, I felt like I’d graduated from Cookie Academy. The cups of cocoa and finger-licked batter were all worth it. This method is forgiving, so if you mix a hair too long or your oven is a degree off, the cookies will still be delicious.
Directions
- Preheat your oven to 350°F (175°C). Line a baking sheet with parchment paper.
- In a large bowl, whisk together 1 cup unsweetened cocoa powder and 2 cups granulated sugar; stir in 1/2 cup vegetable oil until combined.
- Add 4 large eggs one at a time, mixing after each; stir in 2 teaspoons vanilla extract.
- In another bowl, whisk 2 cups all-purpose flour, 2 teaspoons baking powder, and 1/2 teaspoon salt. Gradually fold into wet mixture until blended.
- Chill the dough for about 30 minutes.
- Scoop tablespoon-sized portions, roll into balls, then roll in 1 cup powdered sugar until coated.
- Place on the prepared sheet about 2 inches apart. Bake 10–12 minutes until edges are set and centers are soft. Cool briefly on the sheet, then transfer to a rack to cool completely.
Tips for Best Results
Chill the dough. I can’t overstate it. If you’re impatient, pop the dough in the freezer for 10–15 minutes — it speeds things up but don’t forget it. Use a cookie scoop for uniform sizes; uneven cookies bake at different rates and nobody has time for that drama.
If your powdered sugar keeps getting absorbed, toss your coated dough balls into the sugar twice for a thicker crust. Rotate the baking sheet halfway through baking if your oven has hot spots. And always, always let them rest a minute on the pan before moving them — hot cookies are fragile.
If you want sharper-looking cracks, use a fine powdered sugar and double coat. For a softer top with a hint of shine, use a light dusting.
Ingredient Substitutions & Variations
Want to tweak things? Go for it. That’s half the fun.
- Gluten-free: Replace the all-purpose flour with a 1:1 gluten-free blend. Texture might be slightly different but still satisfying.
- Dairy-free: The recipe is already dairy-light, but confirm your powdered sugar brand if strictly dairy-free — some are processed with bone char (I switched brands to be safe).
- Flavor boosts: Add 1 teaspoon orange zest for a citrus-chocolate twist or 1 tablespoon espresso powder to deepen the chocolate notes.
- Mix-ins: Drop in 1/2 cup chocolate chips, chopped nuts, or dried cherries for extra texture.
- Holiday version: Dust with colored sugar for festive vibes or sandwich two cookies with a thin layer of ganache.
If you want to align these with high protein meals, consider serving alongside small portions of high protein ready meals for a balanced treat-time rather than replacing your main meal.
Pairing Ideas (Drinks, Sides, etc.)
These cookies shine with a steaming mug of coffee or a simple glass of milk — almond, oat, or regular. For adults, a rich hot chocolate or a mellow decaf pairs beautifully. I once paired them with a bowl of cinnamon-spiced roasted apples for a cozy autumn platter.
For a crowd, serve them next to simple finger foods from prepared meals for two offerings — they’re a perfect sweet finish when you don’t have time for a fussy dessert. If you’re hosting a brunch with a full english breakfast vibe (but lighter), these are an indulgent nod on the side.
For a modern twist, serve with Greek yogurt and a drizzle of honey to balance the decadence — especially useful if you’re trying to keep desserts alongside healthy eating for two plans.
How to Store and Reheat Leftovers
Store in an airtight container at room temperature for up to 5 days. Layer cookies with parchment to prevent them from sticking together. If you want that “freshly baked” warmth, microwave a cookie for 8–10 seconds — it’ll be soft and gooey like just out of the oven.
Don’t refrigerate unless it’s hot and humid where you live; refrigeration can dry them out. If they do go a touch stale, pop them in a 300°F oven for 3–4 minutes to revive that just-baked texture.
If you stash them in the freezer, thaw at room temperature or reheat gently in a 325°F oven for about 5–7 minutes.
Make-Ahead and Freezer Tips
These cookies are freezer-friendly. After rolling into balls, flash-freeze them on a tray for an hour, then transfer to a freezer bag for up to 3 months. When you’re ready, roll in powdered sugar and bake from frozen — add 1–2 minutes to the bake time.
You can also bake a batch and freeze the baked cookies in a single layer in a sealed container. Thaw at room temperature or microwave briefly before serving.
Make-ahead tip: Mix the dough the night before, chill overnight, and bake the next day. It intensifies the flavor and saves you active time.
Common Mistakes to Avoid
- Skipping the chill step: leads to flat, sad cookies. Don’t do it.
- Overmixing once the flour’s added: makes cookies dense. Fold gently.
- Using a different sugar ratio without adjusting flour: can make them spread too much. Stick to the recipe until you’re comfortable experimenting.
- Baking too long: centers will dry out. Remove when centers are still soft.
- Under-coating with powdered sugar: you’ll miss the signature crackle look.
Frequently Asked Questions (FAQ)
Q: Can I make these gluten-free?
A: Yes. Use a 1:1 gluten-free flour blend and check for any textural changes; almond flour swap also works well.
Q: How do I make them less sweet?
A: Reduce granulated sugar by 1/4 cup, but don’t reduce powdered sugar for coating — that’s more aesthetic.
Q: Can I use butter instead of vegetable oil?
A: You can substitute with melted butter, but the texture will be slightly firmer and the flavor richer.
Q: Do these cookies freeze well baked or unbaked?
A: Both. Flash-freeze unbaked balls or freeze baked cookies in a single layer.
Cooking Tools You’ll Need
- Large mixing bowl
- Whisk or hand mixer
- Measuring cups and spoons (or kitchen scale)
- Cookie scoop or tablespoon
- Baking sheet and parchment paper
- Wire cooling rack
Final Thoughts
I always keep a jar of these cookies in the pantry when life gets busy. They’re my weatherproof dessert — sunny or stormy, they make everything a little better. Baking them has become my default comfort ritual: the scooping, the sugary coating, that first steam-rising-from-the-cookie smell when I crack the oven door. It’s small domestic magic.
If you try them and your first batch is less than perfect, don’t fret. I’ve had many imperfect batches — burned bottoms, flattened tops, sugar that refused to stick — and each one taught me a small lesson about ovens and patience. The best part is sharing them: with neighbors, with kids, or with someone who needs a little chocolate pick-me-up. They work as a cozy finish to healthy comfort food dinners, a portable treat for meals for 2 delivered nights, or as an indulgent pause in a busy day of meal prep microwave lunches.
Baking isn’t about perfection; it’s about the stories that happen along the way. If you enjoyed this recipe, don’t forget to save it on Pinterest or share it with a friend!
Conclusion
For a tried-and-true version, I love Preppy Kitchen’s Chocolate Crinkle Cookies Recipe for its clear photos and approachable method.
If you want a double chocolate spin, check out the Double Chocolate Crinkle Cookies from Sally’s Baking Addiction.
For a gooey texture and bright flavor notes, see the variation at What’s Gaby Cooking’s Gooey Chocolate Crinkle Cookies.
And for a classic, reliable version with simple tips, take a look at Simply Recipes’ Chocolate Crinkles.
Chocolate Crinkle Cookies
Ingredients
Dry Ingredients
- 1 cup unsweetened cocoa powder Use Dutch-processed for a smoother flavor.
- 2 cups granulated sugar Gives structure and glossy crinkle top.
- 2 cups all-purpose flour Spoon and level to avoid dense cookies.
- 2 teaspoons baking powder Provides lift for the cookies.
- 1/2 teaspoon salt Balances the sweetness and chocolate.
Wet Ingredients
- 1/2 cup vegetable oil Keeps cookies soft; mild olive oil is a substitute.
- 4 large eggs Bind and lift the dough.
- 2 teaspoons vanilla extract Use a good quality for the best flavor.
Coating
- 1 cup powdered sugar For coating the cookies after rolling.
Instructions
Preparation
- Preheat the oven to 350°F (175°C) and line a baking sheet with parchment paper.
- In a large bowl, whisk together cocoa powder and granulated sugar; stir in vegetable oil until combined.
- Add eggs one at a time, mixing after each addition; stir in vanilla extract.
- In another bowl, whisk flour, baking powder, and salt. Gradually fold into wet mixture until blended.
- Chill the dough in the refrigerator for about 30 minutes.
Baking
- Scoop tablespoon-sized portions of dough and roll into balls; then roll in powdered sugar until coated.
- Place on the prepared baking sheet about 2 inches apart and bake for 10-12 minutes until the edges are set and centers are soft.
- Allow cookies to cool on the baking sheet for a few minutes before transferring them to a wire rack to cool completely.