
Easy Crispy Spicy Korean Chicken Katsu
I remember the night I first decided to make this Korean-style chicken katsu like it was last Tuesday — though honestly, it was three winters ago, with snow piling on the windowsill and a sitcom marathon on mute in the background. I wanted something bold, crunchy, and warm, something that would scream comfort but also feel easy weeknight dinners friendly. I ended up with flour on the ceiling (don’t ask), a smoke alarm serenade, and the best chicken I’d ever breaded at home. To be real — the first attempt was a glorious disaster. The breading slid off like an awkward first date, and I learned quickly about chilled chicken, firm breading technique, and the magic of panko crispiness.
This recipe became my go-to for quick family meals and those “I need to impress but I’m tired” nights. The sauce? Sweet, spicy, and sticky — thanks to a little gochujang, honey, and soy sauce — and it pairs like a dream with the crunchy cutlets. My tiny kitchen smells like garlic, toasted breadcrumbs, and victory whenever I make it. If you’re hunting for budget-friendly recipes that don’t read like college macaroni, or craving something that doubles as healthy comfort food when paired with a green salad or bowl of steamed rice, you’re in the right place.
If you love chicken and want more inspiration, check out my other chicken recipes that are perfect for meal planning and busy nights. This katsu hits a sweet spot — high crunch, high flavor, and high returns for not much effort. It’s an approachable spin on a Korean favorite that’ll kindly demand seconds.
Why You’ll Love This Recipe
- It’s a champion among easy weeknight dinners — quick to prep and faster to vanish.
- High on flavor and high protein meals friendly: breaded chicken breasts make this a strong contender for high protein high carb low fat meals if you balance the sides.
- Kids and picky eaters love the crunch and the sweet-spicy glaze — this is basically a comfort food win.
- Leftovers reheat beautifully, so it doubles as best meal prep plans compatible food for lunches or dinner the next day.
- Versatile. Eat it with rice, in a sandwich, or slice it over a salad for a satisfying meal prep microwave lunches option.
- It’s budget-friendly, accessible, and uses pantry staples — which makes it a great candidate for cheap meal plans for 2 or feeding a whole fam without fuss.
What Makes This Recipe Special?
This katsu is my bridge between two comfort universes: Japanese-style breaded chicken and the fiery, gochujang-forward flavors of Korea. What gives it that addictive edge is the glaze — balanced sweet, savory, and tart with a little heat that lingers but doesn’t dominate. And then there’s the texture contrast: the snap of panko breadcrumbs against tender, juicy chicken. I’ll never forget serving this to my neighbor who swore she didn’t do spicy — she ate three pieces and came back for more with a sly grin. Oops.
I also love that this recipe forgives small mistakes. Overbrowned? Slice and serve in a bowl with sauce. Breading flopped? Re-dip and press a little harder next time. It’s the kind of recipe that rewards practice and improvisation, which is why it’s become such a staple in my kitchen.
Ingredients
- 2 chicken breasts — sliced into thinner cutlets for quick, even cooking. Thinner pieces = less time and a better crunchy-to-meat ratio.
- 1 teaspoon salt — basic but necessary to season the meat through.
- 1 teaspoon black pepper — freshly ground if you can; it wakes everything up.
- 1 teaspoon garlic powder — for an extra layer of savory depth beyond the fresh garlic.
- 1 cup all-purpose flour — the dry base for your dredge; swap to rice flour for a gluten-free option that still crisps nicely.
- 2 eggs — beaten, these are the glue that helps the breadcrumbs cling.
- 1 cup panko breadcrumbs — the hero of the crunch world; I buy the Japanese brand if I want the flakiest texture.
- 1 cup oil — use a neutral, high smoke point oil like canola or vegetable. Peanut oil is great too if you’re not allergic.
- 1/4 cup soy sauce — use tamari for gluten-free and a deeper flavor.
- 2 tablespoons rice vinegar — brightens and balances the glaze.
- 2 tablespoons sugar — helps with that glossy sticky finish; honey or agave can replace it for a less refined sweetener.
- 2 tablespoons honey — I love the floral notes; adjust to taste.
- 2 tablespoons gochujang — this is your spicy backbone. If you’re new to it, start with a touch less and add later.
- 2 cloves garlic, minced — fresh garlic sings here; jarred works but fresh is better.
- 1 teaspoon grated ginger — warmth and a peppery lift.
Why each ingredient matters:
- Chicken breasts are forgiving and lean; slice them thin for fast cooking and fewer dry edges.
- Flour, egg, panko is the classic triple play for a durable, crisp crust. Don’t skip the egg step; it’s not optional unless you’re doing a dry coating variation.
- The glaze balances sweet (sugar, honey), tang (rice vinegar), and heat (gochujang). It turns a good cutlet into an addictive one.
Personal tips and substitutions:
- If you’re watching carbs or following a keto meal plan, use almond flour and crushed pork rind substitutes — but since we’re avoiding pork, crushed pork rind isn’t an option; instead try crushed pork-free keto breadcrumbs or parmesan mixed with almond flour.
- Don’t crowd the pan when frying. Overcrowding drops oil temperature and makes the katsu soggy.
- For extra flavor, brine the chicken briefly in salted water or a sweet soy marinade for 20–30 minutes before breading.
- Don’t do this: don’t skip letting the oil get hot. If the oil isn’t hot enough, you’ll end up with greasy, limp breading. Trust me, I learned that the smoky way.
How to Make It Step-by-Step
First things first, set up your station. Lay out three wide shallow bowls: one with the flour seasoned with salt, pepper, and garlic powder; one with the beaten eggs; one with the panko breadcrumbs. Pat the chicken dry with paper towels — this is a small moment that makes a big difference. I usually slice mine into thinner cutlets and then press them gently to an even thickness. Uneven pieces = uneven cooking, and no one wants biting into a dry edge.
Season both sides of the chicken with a little salt and black pepper. Dredge each piece in flour, shaking off the excess. I say shake it off like you mean it — too much flour will make the egg not stick properly. Then dip into the eggs, letting excess drip back into the bowl, and press firmly into the panko. Don’t be shy here; press until the breadcrumbs adhere like a little armor. If the first breadcrumb coat looks thin, re-dip in egg and press again — this builds an irresistibly thick crust.
Heat your oil in a heavy skillet over medium-high heat until it shimmers. If you have a thermometer, aim for about 350°F (175°C). Gently lay the cutlets into the oil; you’ll hear that satisfying hiss — music to my ears. Fry for about 3–4 minutes per side depending on thickness. You want a golden-brown crust that’s crisp to the touch. Flip only once if possible. Use tongs and a slotted spatula to avoid losing those crunchy bits.
While the chicken is frying, whisk together the sauce in a small saucepan: soy sauce, rice vinegar, sugar, honey, gochujang, minced garlic, and grated ginger. Simmer it on low for 2–3 minutes until it thickens slightly and becomes glossy. Taste and tweak — more honey if you want sweeter, more gochujang for heat. When the cutlets are done, transfer them to a wire rack over a sheet pan to drain excess oil — paper towels work in a pinch, but a rack keeps the crust from steaming and softening.
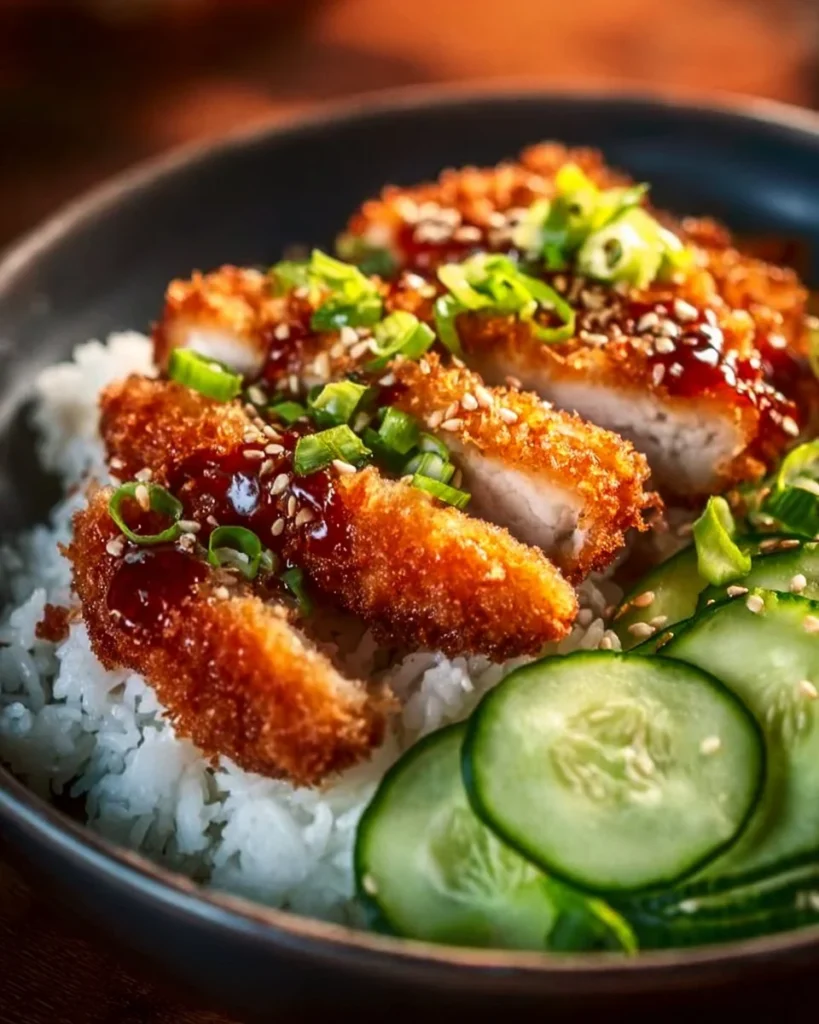
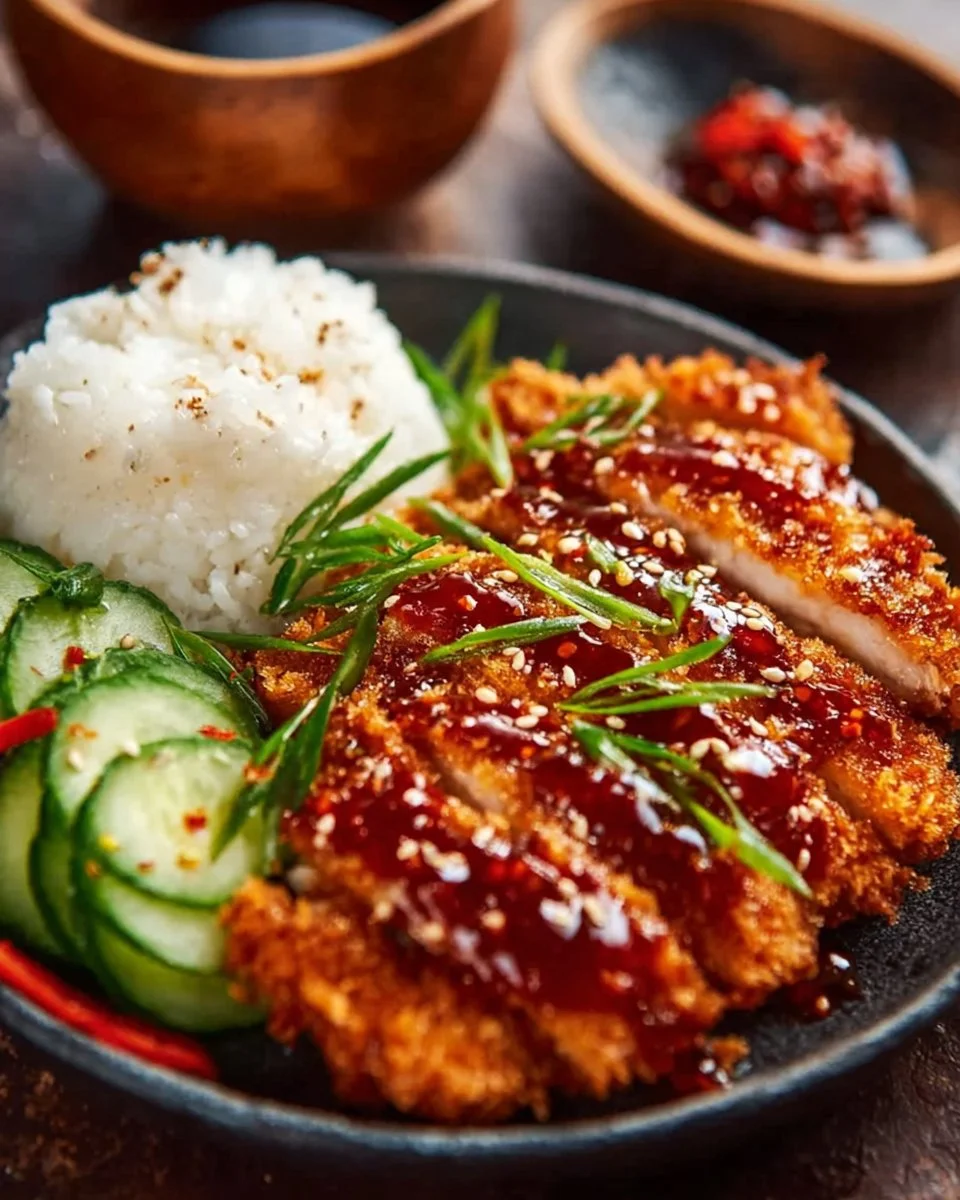
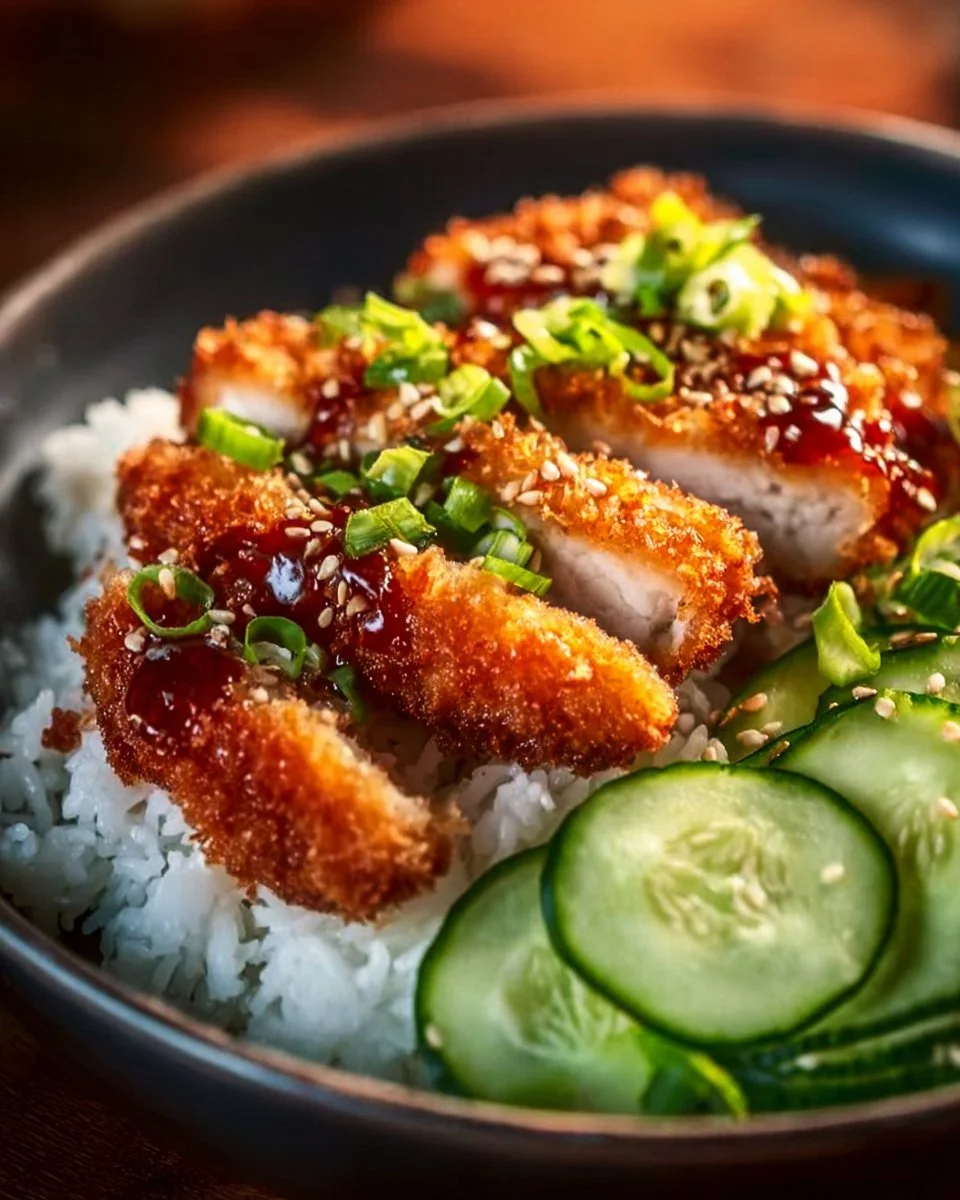
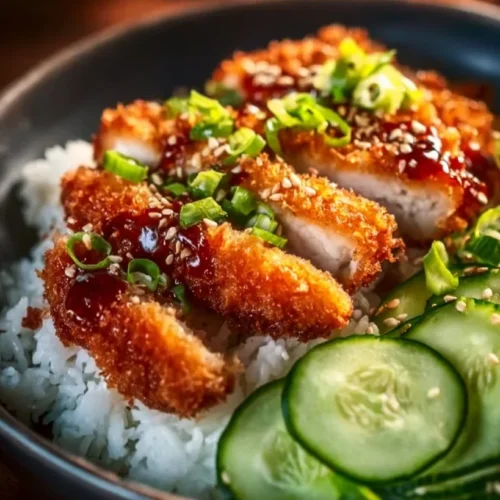
Once the katsu is rested, brush the sauce over the cutlets, or toss sliced katsu in the sauce gently to coat. I love slicing mine into strips and plating it on a bed of steamy rice with a handful of pickled cucumbers and scallions. The crunch stays, the sauce clings, and the kitchen smells like garlic and toasted breadcrumb heaven.
Confessional kitchen disasters and fixes: One time I hurried and tossed frozen chicken — big mistake. It released water and the breading never stuck. Solution: always thaw completely and pat dry. Another time I over-seasoned the flour and the final dish tasted oddly salty; lesson learned to season incrementally and taste your sauce before finishing.
Encourage improvisation: want more heat? Add chili flakes or a splash of sriracha. Want something smokier? Stir in a teaspoon of toasted sesame oil to the glaze. Want it lighter? Bake the breaded cutlets at 425°F on a greased rack for 15–18 minutes, flipping halfway, until golden. For extra indulgence, sandwich the cutlet between soft brioche with shredded cabbage and a drizzle of spicy mayo.
If you’re experimenting with meal prep, slice the katsu and pack it over rice with the sauce in a separate container. Reheat in a toaster oven to keep the crust crisp, or microwave for convenience if you’re doing meal prep microwave lunches — just expect a softer crust that way.
For more creamy chicken vibes that pair beautifully with this style of cooking, I sometimes alternate with my creamy garlic mushroom spinach chicken for family dinner nights; it hits that cozy, stick-to-your-ribs spot in a completely different texture direction.
Directions
In short: season and slice the chicken, dredge in flour, egg, and panko, then fry in hot oil until golden and cooked through (about 3–4 minutes per side). Meanwhile, simmer soy sauce, rice vinegar, sugar, honey, gochujang, garlic, and ginger until glossy. Drain cutlets on a rack, brush or toss with the glaze, slice, and serve. For a lighter option, bake at 425°F on a rack until golden. Simple, crunchy, and wildly satisfying.
Tips for Best Results
- Dry chicken = better breading. Pat it thoroughly before you dredge. I keep a stack of paper towels handy for this.
- Use a thermometer if you can. Chicken breasts should reach 165°F internal for safe, juicy meat.
- Keep oil temperature steady. Too cool and you get greasy, too hot and the crust burns before the inside cooks.
- Don’t skip the rest. Letting the cutlets rest briefly after frying helps redistribute juices and prevents steam from making the crust soggy.
- If you plan to reheat, a toaster oven keeps the crunch best. Microwave if you’re desperate — it’s fine, just softer.
- For extra crunch, mix a few crushed cornflakes into your panko — quirky, but it works when I’m low on panko.
Ingredient Substitutions & Variations
- Gluten-free: swap all-purpose flour for rice flour and use tamari instead of soy sauce; panko-style gluten-free breadcrumbs are widely available.
- Less sugar: skip the granulated sugar, increase honey slightly, or use a sugar-free sweetener suitable for cooking.
- Vegetarian twist: use thick slices of eggplant or firm tofu pressed dry and coated the same way; adjust frying time.
- More heat: add another teaspoon of gochujang or a pinch of cayenne to the glaze.
- Oven-baked option: brush cutlets lightly with oil and bake at 425°F on a rack for 15–20 minutes, flipping once.
- Add texture: sprinkle toasted sesame seeds and sliced scallions on top for a nice finish.
Pairing Ideas (Drinks, Sides, etc.)
- Drinks: an ice-cold lager, a crisp white wine like sauvignon blanc, or green tea with lemon. For non-alcoholic fizz, a yuzu soda or ginger ale pairs beautifully.
- Sides: steamed jasmine rice, a crunchy cabbage slaw with rice vinegar dressing, or quick kimchi for a spicy, fermented contrast.
- Sandwich idea: serve the cutlet in a toasted bun with shredded cabbage and spicy mayo — pure weekend glory.
- Dessert: keep it light — something citrusy like a lemon sorbet to cut through the fried richness, or a simple green tea ice cream.
How to Store and Reheat Leftovers
Store cooled cutlets in an airtight container in the fridge for up to 3 days. Keep the glaze separate if you prefer to re-crisp before saucing. Reheat in a toaster oven or conventional oven at 350–375°F for 8–10 minutes until warmed through and crisp. If you must microwave, cover loosely and use short bursts to avoid turning the crust into mush. For packed lunches, slice and place sauce in a small container to add after reheating.
Make-Ahead and Freezer Tips
You can bread the chicken and freeze it raw on a tray for up to a month. Flash-freeze the individual breaded cutlets, then transfer to a freezer bag. When ready to cook, fry from frozen (a couple extra minutes per side) but be careful of oil splatter. Alternatively, fully cooked cutlets freeze well; reheat in a 400°F oven for 10–12 minutes until crisp.
Common Mistakes to Avoid
- Frying cold, wet chicken: it steals your crisp. Always dry the meat.
- Oil not hot enough: leads to greasy breading. Use a thermometer if you’re uncertain.
- Overcrowding the pan: it drops the oil temp and you get soggy cutlets.
- Skipping a wire rack: draining on paper towels traps steam and softens the crust.
- Ignoring the glaze taste: always taste and adjust. Too sweet or too salty? Tweak with vinegar or honey.
Frequently Asked Questions (FAQ)
Q: Can I bake this instead of frying?
A: Yes — bake at 425°F on a greased rack for 15–20 minutes, flipping halfway. The texture will be slightly less crisp but still delicious.
Q: How do I make this less spicy?
A: Reduce the gochujang to 1 tablespoon and add a touch more honey to balance. Or use a mild chili paste.
Q: Can I prep the breading steps ahead?
A: Absolutely. Bread the chicken, place it on a tray, cover, and refrigerate for a few hours. Avoid long refrigeration with wet eggs exposed.
Q: Is panko necessary?
A: Panko gives the best crunch, but you can use regular breadcrumbs or crushed cereal in a pinch.
Cooking Tools You’ll Need
- Heavy skillet or cast-iron pan
- Three shallow bowls for dredging
- Wire rack over a baking sheet
- Tongs and slotted spatula
- Instant-read thermometer (optional but very useful)
- Small saucepan for the glaze
Final Thoughts
This Crispy Spicy Korean Chicken Katsu feels like an edible hug — crunchy, saucy, and impossibly comforting. It’s the kind of recipe that forgives the occasional kitchen meltdown and rewards boldness: a confident press of the breadcrumbs, a brave stir of the gochujang, a tiny crackle in the frying pan. Every time I make it, I’m reminded of that messy first try: the smoke alarm, the laughter, the neighbor standing at the door asking to trade baked goods for leftovers. Food has that power to turn small disasters into shared memories, and this katsu has been the catalyst for many of mine.
If you enjoyed this recipe, don’t forget to save it on Pinterest or share it with a friend!
Conclusion
I sometimes daydream about the best spots around town that do similar crunchy-saucy magic — if you’re ever in Atlanta and craving extra spice, check out Best Tteokbokki in Atlanta, GA – SSAMJANG Korean BBQ for a taste inspiration that’ll have you thinking about rice cakes and heat. If you’re in the mood for cheesy fried goodness, don’t miss this playful take on crunchy katsu with the Hot & Spicy Cheese Katsu – Brown Donkatsu — it’s wildly indulgent. For busy nights when you want delivery instead, check out the local options on Wings & Bowls Delivery Menu | Order Online – Grubhub to see what nearby kitchens are whipping up. And if you’re exploring coastal chicken spots, this place had me drooling: Chick N Roll (Centerville) | Toast.
If you enjoyed this recipe, don’t forget to save it on Pinterest or share it with a friend!
Crispy Spicy Korean Chicken Katsu
Ingredients
For the chicken
- 2 pieces chicken breasts, sliced into thinner cutlets Thinner pieces cook quicker and provide a better crunchy-to-meat ratio.
- 1 teaspoon salt Basic but necessary to season the meat.
- 1 teaspoon black pepper Freshly ground if possible.
- 1 teaspoon garlic powder Adds extra savory depth.
- 1 cup all-purpose flour Dry base for dredging; can swap to rice flour for gluten-free.
- 2 pieces eggs, beaten Helps breading to stick.
- 1 cup panko breadcrumbs For a crunchy texture.
- 1 cup oil Use neutral, high smoke point oil like canola.
For the sauce
- 1/4 cup soy sauce Use tamari for gluten-free.
- 2 tablespoons rice vinegar Brightens the glaze.
- 2 tablespoons sugar For a glossy finish; can substitute with honey.
- 2 tablespoons honey Adds floral notes; adjust to taste.
- 2 tablespoons gochujang Spicy backbone of the dish.
- 2 cloves garlic, minced Fresh garlic preferred.
- 1 teaspoon grated ginger Adds warmth and lift.
Instructions
Preparation
- Set up your dredging station with three shallow bowls: one with seasoned flour, one with beaten eggs, and one with panko breadcrumbs.
- Pat the chicken dry with paper towels and slice into thinner cutlets.
- Season both sides of the chicken with salt and pepper.
- Dredge each cutlet in flour, shaking off excess, then dip in eggs, and press into panko breadcrumbs.
Cooking
- Heat oil in a skillet over medium-high heat until shimmering (about 350°F / 175°C).
- Fry the cutlets for 3-4 minutes per side until golden brown. Flip only once.
- Transfer the cooked cutlets to a wire rack to drain excess oil.
Making the Sauce
- In a small saucepan, whisk together soy sauce, rice vinegar, sugar, honey, gochujang, garlic, and ginger.
- Simmer on low for 2-3 minutes until the sauce thickens slightly.
Finishing Touches
- Brush or toss the fried cutlets with the glaze before serving.
- Slice and serve over rice or with pickled cucumbers and scallions.